Guide - User Preferences & Settings

Everything in a members User Control Panel

Whether you are completely new to forums, it's been a while or experiencing some brain fog. Our guides should be able to help you out with whatever you are trying to do.
User avatar
Emz
Admin & Founder
Admin & Founder
Posts: 95
Joined: Sun 10 Mar 2024, 5:39 pm
Full Name: Emily Radcliffe
Location: Maltby
Pronouns: She/Her
Contact:

Guide - User Preferences & Settings

Post by Emz »


You have a choice to either watch our video talking you through your 'User Control Panel' or scroll down to read instead with helpful images showing what we are talking about. Both have the same information.

{ INSERT VIDEO HERE }


User Preferences and Settings - Quick Links
1) User Control Panel
2) Drafts & Attachments
3) Notifications
4) Edit Profile
5) Edit Signature
6) Edit Avatar
7) Account Settings
8) Remember Me Login
9) Edit Global Settings
10) Edit Posting Defaults
11) Edit Display Options
12) Edit Notification Options
13) Edit Memberships
User avatar
Emz
Admin & Founder
Admin & Founder
Posts: 95
Joined: Sun 10 Mar 2024, 5:39 pm
Full Name: Emily Radcliffe
Location: Maltby
Pronouns: She/Her
Contact:

Re: Guide - User Preferences & Settings

Post by Emz »

User Control Panel


(Need a closer look? Clicking the image will open it up, right-click and select 'Open Link in New Tab' to not leave this page.)


To open up one's user control panel, go to the navbar at the top of any page on our forum and click your username. It'll display a drop-down menu where you can click 'User control panel'.


1 & 2 Tabbed Menu and Sections
The image above is the first thing you will see upon going to your user control panel. The panel is broken down into different areas that are shown in the tabbed menu. In each menu area then has further sections on the far left side. We'll be going through most of the different menu areas and sections in this guide.
User avatar
Emz
Admin & Founder
Admin & Founder
Posts: 95
Joined: Sun 10 Mar 2024, 5:39 pm
Full Name: Emily Radcliffe
Location: Maltby
Pronouns: She/Her
Contact:

Re: Guide - User Preferences & Settings

Post by Emz »

Drafts & Attachments


(Need a closer look? Clicking the image will open it up, right-click and select 'Open Link in New Tab' to not leave this page.)


To open up one's user control panel, go to the navbar at the top of any page on our forum and click your username. It'll display a drop-down menu where you can click 'User control panel'.

We will not be going through subscriptions and bookmarks in this guide, for this information please go here.


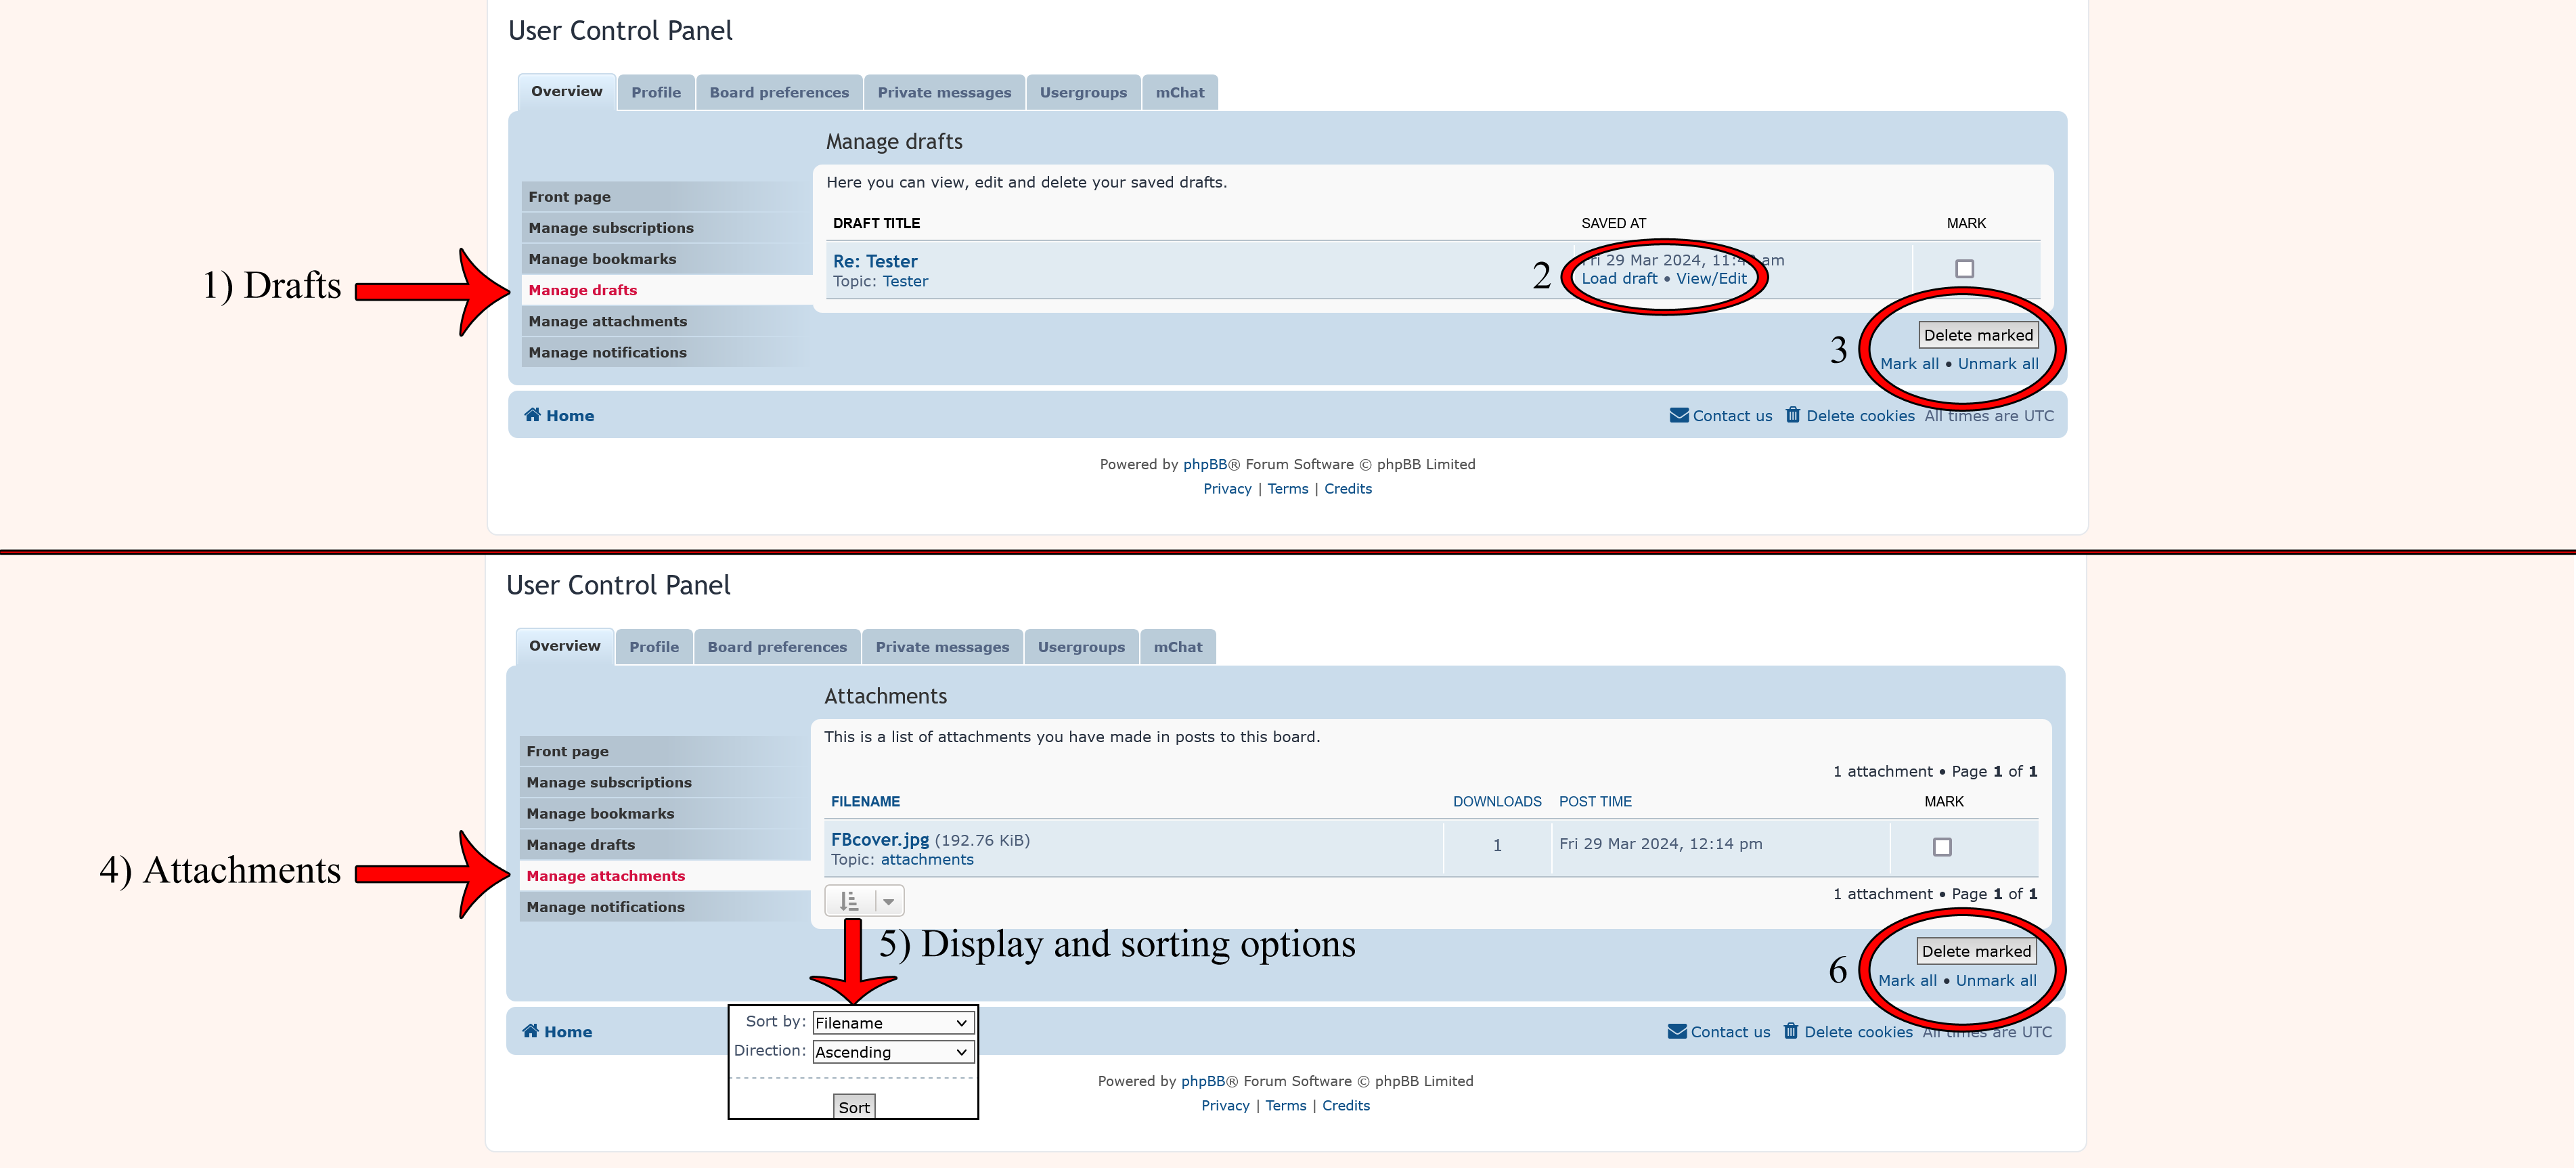
1) Drafts
When posting on our forum, you will have the option to 'Save draft', any drafts saved will appear in this area of your user control panel. We have saved a draft here to show you how it will appear. You'll see the name of the post and the topic name underneath, usually these are the same. Here we have a 'Re:' meaning this draft post was a reply to a topic.


2) Load, View, Edit
You can 'Load draft', taking you into the posting area where you can finish/edit your draft and post. 'View/Edit' keeps you in the user control panel and allows you to view/edit the post but not post it.


3) Select Drafts
Here you can mark/unmark all the drafts, (each draft has a mark box you can tick at the far right) and whichever drafts are marked can be deleted.


4) Attachments
In some areas of the forum, you will be allowed to upload attachments from your computer. Think of them like attachments in an email. Any uploaded files will appear here. Please note, that any deleted posts/topics with your attachments will automatically be deleted from this area. We ask that you try not to upload too many attachments, as this will take up space on our website/forum hosting provider. It's best to upload files to another location and link to them. See our guide here on how to do this.


5) Display and Sorting Options
If you happen to have a few attachments, you can change how they are displayed and sorted using this button. You can sort by; filename, file comment, extension, file size, downloads, post time and topic title. With the direction you can change whether they are ascending or descending.


6) Select Attachments
Here you can mark/unmark all the attachments, (each attachment has a mark box you can tick at the far right) and whichever attachments are marked can be deleted.
User avatar
Emz
Admin & Founder
Admin & Founder
Posts: 95
Joined: Sun 10 Mar 2024, 5:39 pm
Full Name: Emily Radcliffe
Location: Maltby
Pronouns: She/Her
Contact:

Re: Guide - User Preferences & Settings

Post by Emz »

Notifications


(Need a closer look? Clicking the image will open it up, right-click and select 'Open Link in New Tab' to not leave this page.)

To open up one's user control panel, go to the navbar at the top of any page on our forum and click your username. It'll display a drop-down menu where you can click 'User control panel'.

There are two types of notifications, ones that alert you here on the forum and the other being emailed to you. You can set your preferred notification methods in the user control panel under 'Board preferences'. We will be going over that area further along in this guide/topic.


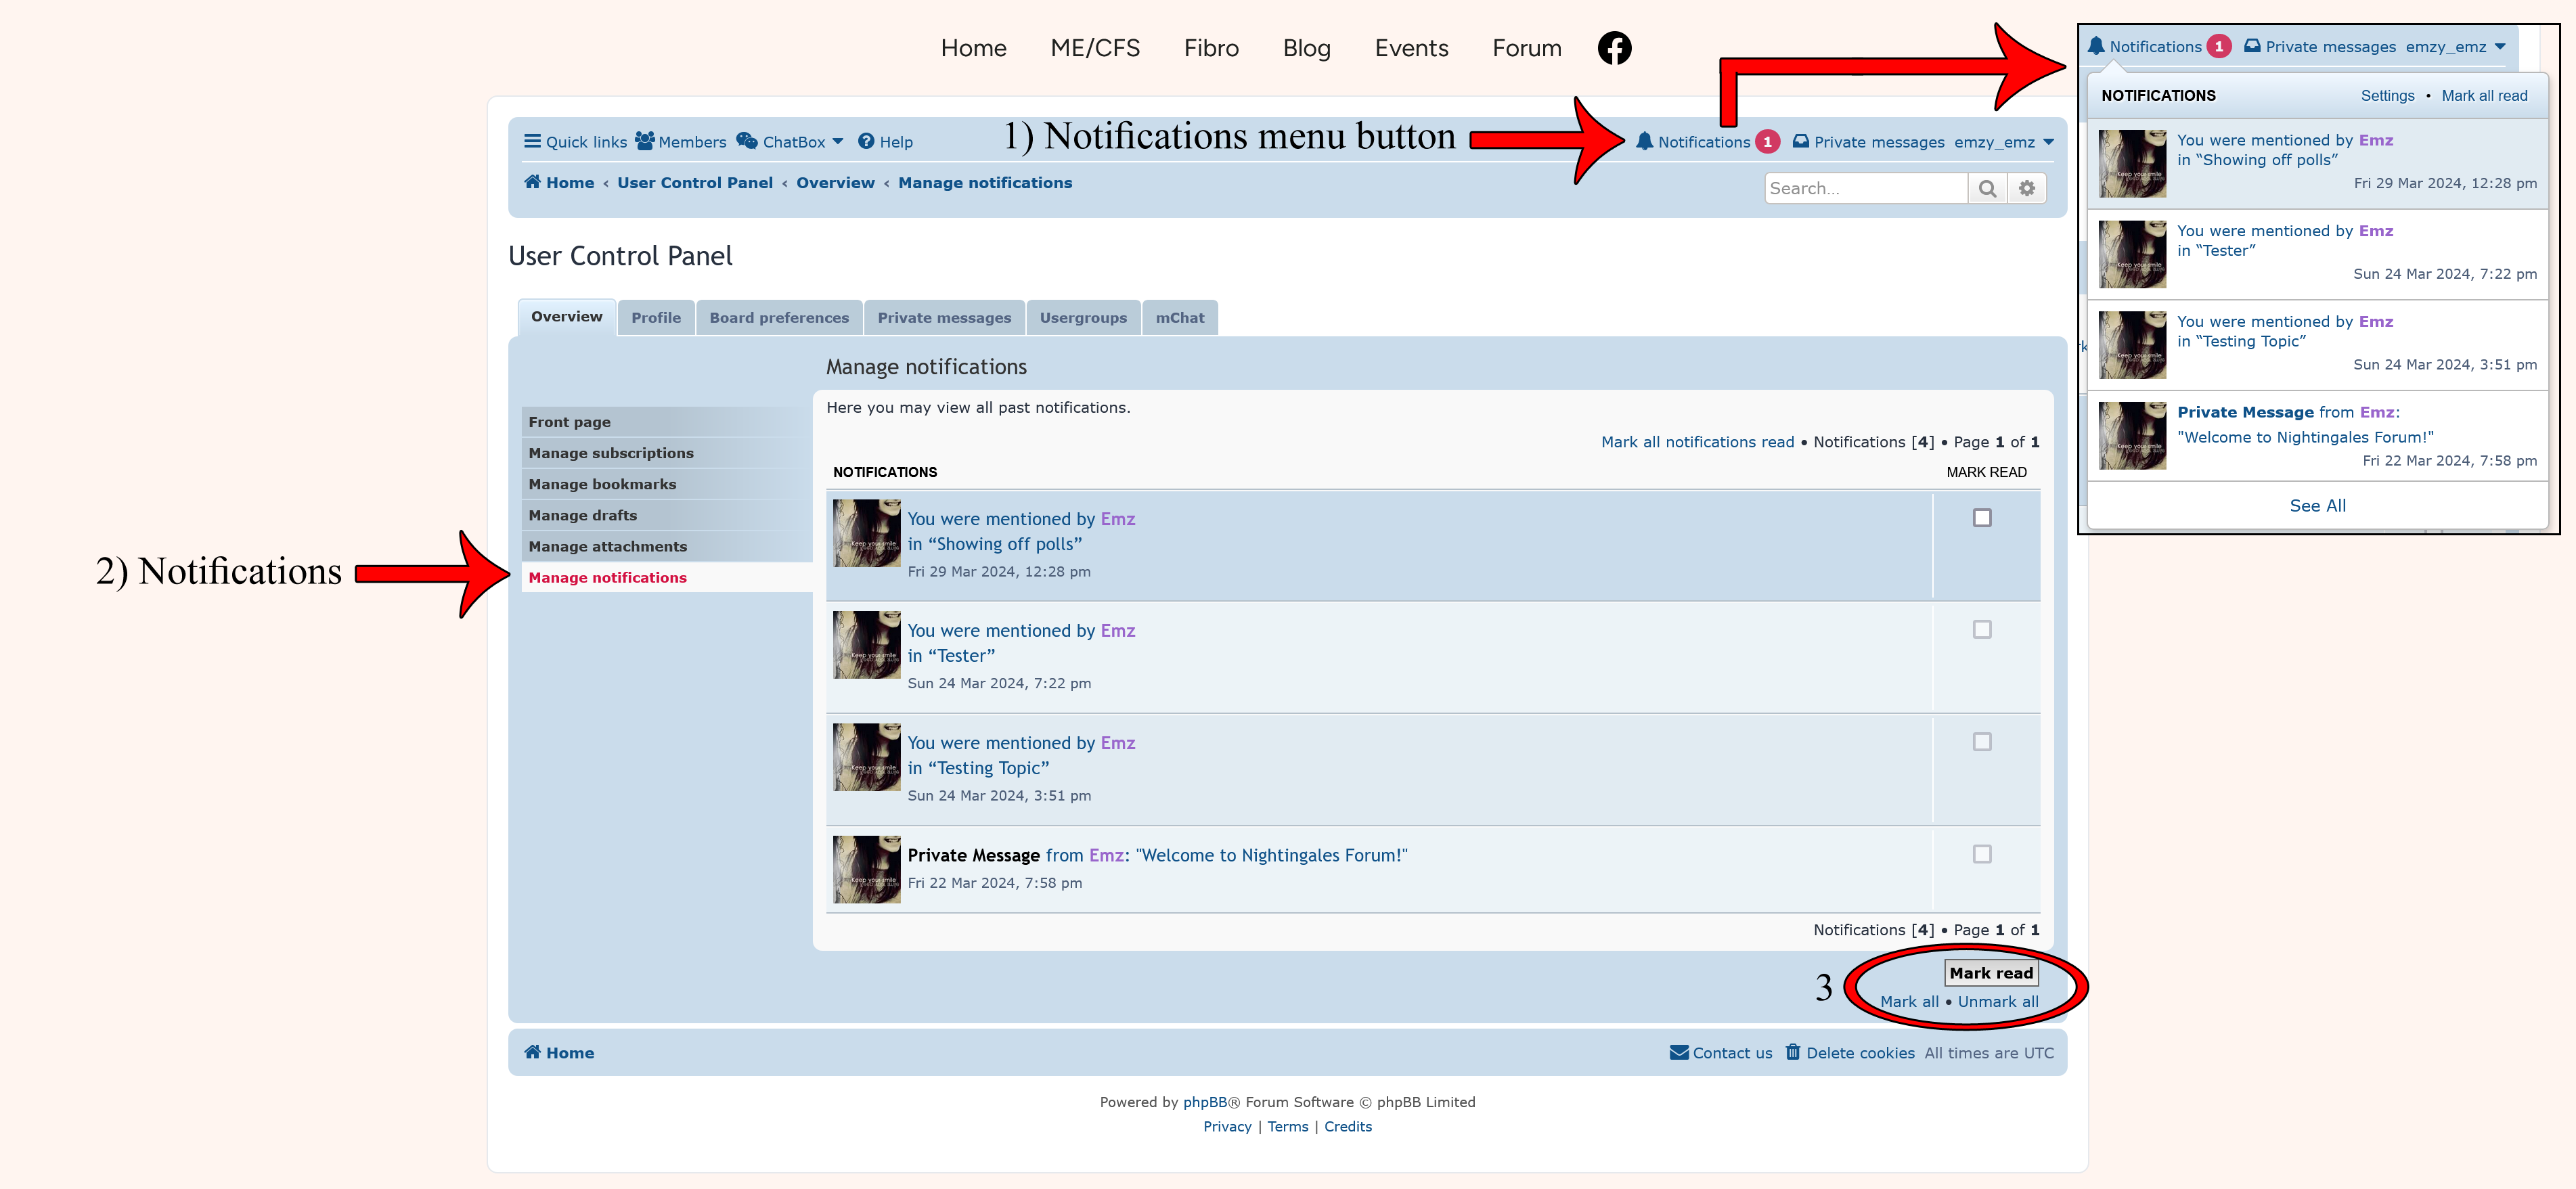
1) Notifications Menu Button
In the navbar on the far right is your notifications button. Whenever you have a new notification a red circle will appear with the number of notifications inside. Clicking this menu button displays a drop-down menu as seen in the image above. Notice that the top notification, which is new, has a slightly different colour background to showcase it's new.

Clicking 'See all' at the button will take you to the user control panel section you see in the image, displaying all your notifications. 'Settings' will take you to the 'Board preferences' area that lets you change your preferred notification methods. 'Mark all read' will let the forum know you have seen all notifications and it'll remove the red circle.


2 & 3 Notifications
This area, as stated above, will show you all your notifications. If you have selected to have notifications on our forum, it's best to check in with this area from time to time and keep it tidy.

You can do this with the area circled (3), mark/unmark all the notifications, (each notification has a mark box you can tick at the far right) and whichever notifications are marked can be deleted.
User avatar
Emz
Admin & Founder
Admin & Founder
Posts: 95
Joined: Sun 10 Mar 2024, 5:39 pm
Full Name: Emily Radcliffe
Location: Maltby
Pronouns: She/Her
Contact:

Re: Guide - User Preferences & Settings

Post by Emz »

Edit Profile


(Need a closer look? Clicking the image will open it up, right-click and select 'Open Link in New Tab' to not leave this page.)

To open up one's user control panel, go to the navbar at the top of any page on our forum and click your username. It'll display a drop-down menu where you can click 'User control panel'. Then click the second top tab 'Profile'.

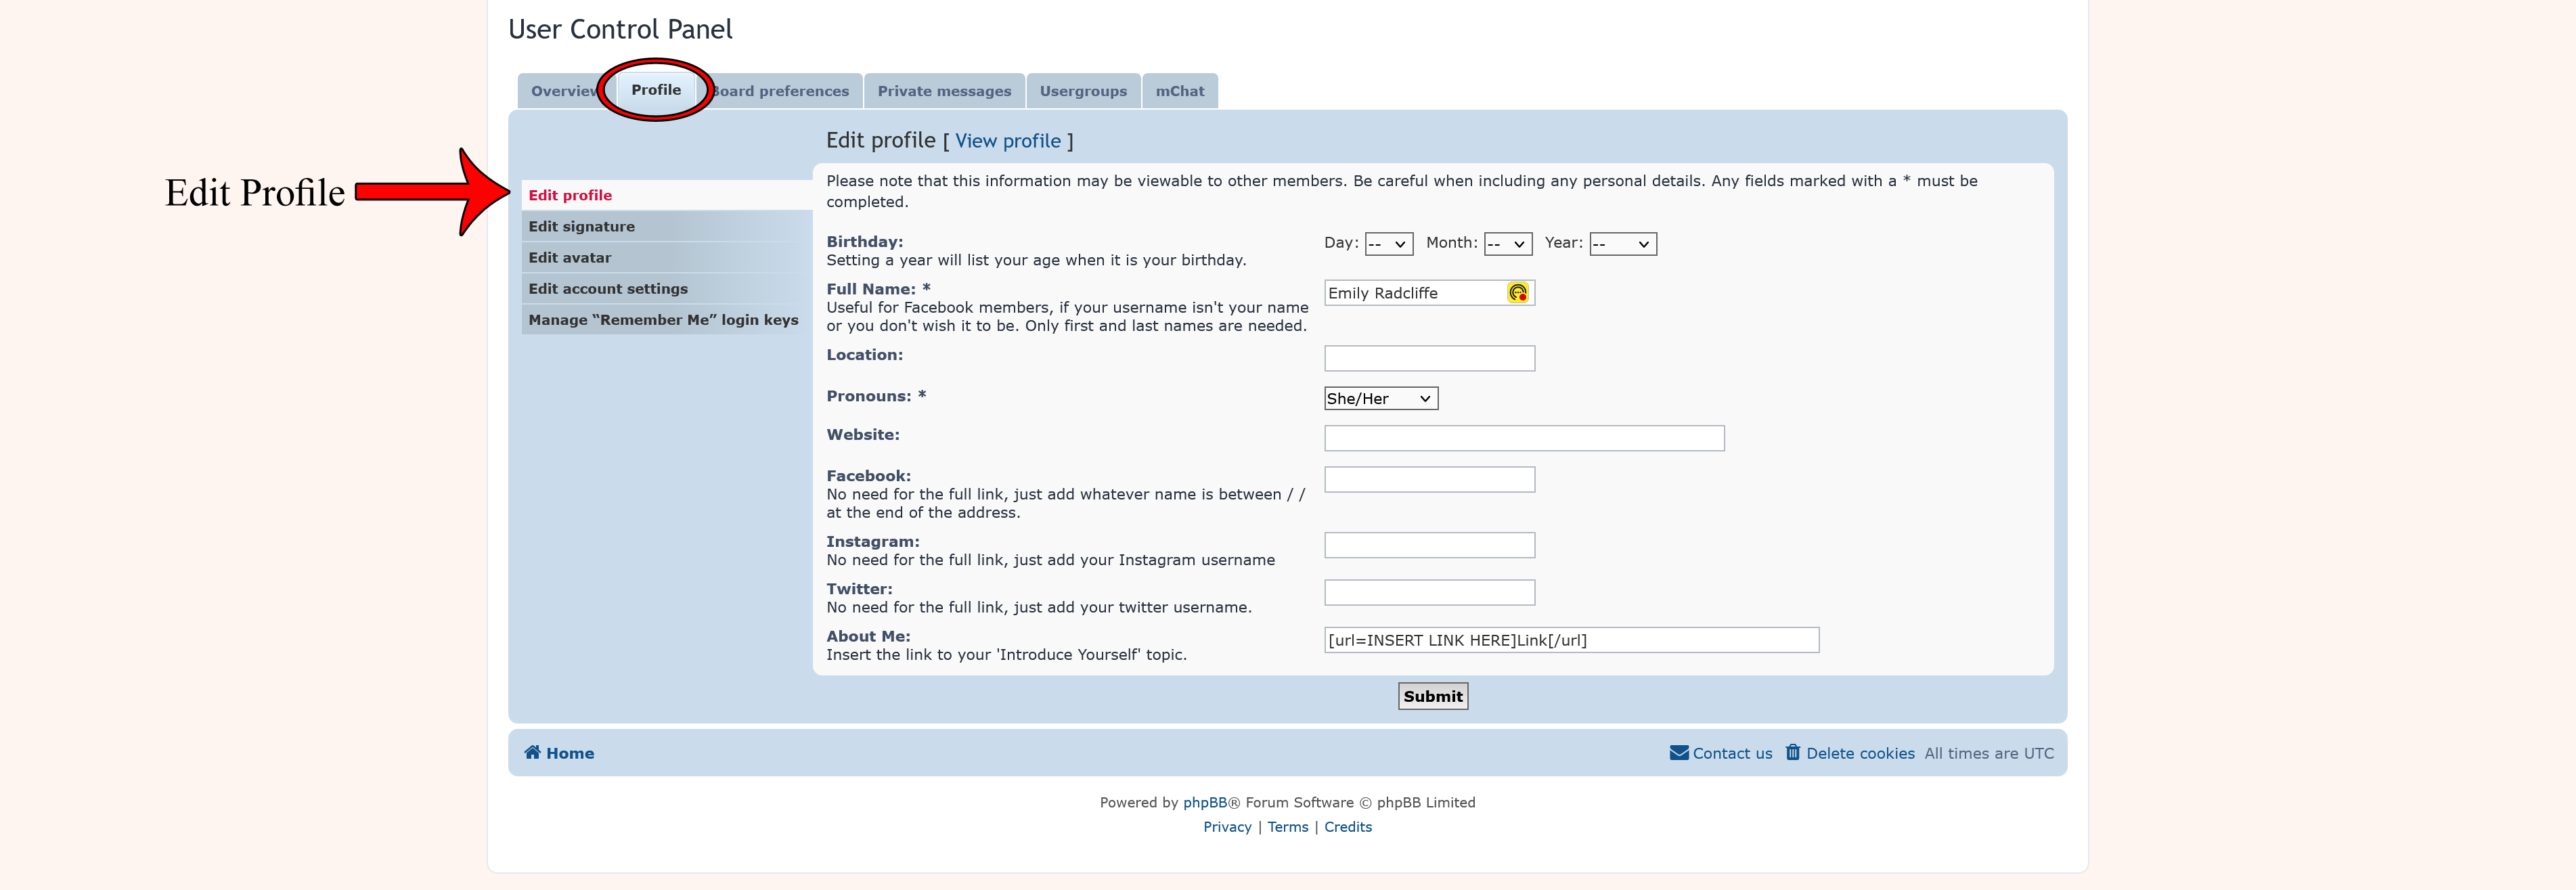
Here you can fill in or change what appears on your profile. This information may also appear on the right side of any posts/private messages you send and also on the member list. At the top of this section, you will see the option to 'View Profile', which is handy, enabling you to view any changes you make.

Profile Fields

Birthday - This isn't something you have to fill in, but doing so means it'll appear in the 'Birthdays' section of the stats at the bottom of the forums home page. It'll also mean you'll more likely having members wish you a happy birthday! If filled in your age will appear in your profile.


Full Name - This is a field that must be filled in and you filled in during registering with Nightingales Forum. As it says, this can be useful for Facebook members, if your username isn't your name or you don't wish it to be. Only first and last names are needed. This will appear on your profile and member list.


Location - If filled in this will appear on your profile and the member list.


Pronouns - Another field that must be filled in, while most will go with the pronouns of their gender at birth. We know not everyone does and this lets members know which pronoun they would prefer to be known as.


Website - Happen to have a website? Why not enter the URL here.


Facebook - Let members easily find you on Facebook by entering your URL name here. Go to your profile on Facebook, you'll notice the full URL to be something like the following :

Code: Select all

https://www.facebook.com/emily.radcliffe
Or maybe it's more like

Code: Select all

https://www.facebook.com/profile.php?id=
with a bunch of numbers at the end.

When filling in the Facebook field you don't need the full address, just whatever appears after the '/'. So for myself I just have to enter 'emily.radcliffe', for something with the bunch of numbers they'll have to enter 'profile.php?id=' and whatever numbers appear after the '='.


Instagram - Have an Instagram account? Just enter your username in the text box.


Twitter/X - Just like with Instagram, just enter your username.


About Me - When you have introduced yourself in the 'Introduce Yourself' board, your topic link will go here.
Simply delete the text saying 'INSERT LINK HERE' and replace it with the URL of your topic link.


REMEMBER! After doing any changes to your profile, click 'Submit' for them to be saved.
User avatar
Emz
Admin & Founder
Admin & Founder
Posts: 95
Joined: Sun 10 Mar 2024, 5:39 pm
Full Name: Emily Radcliffe
Location: Maltby
Pronouns: She/Her
Contact:

Re: Guide - User Preferences & Settings

Post by Emz »

Edit Signature


(Need a closer look? Clicking the image will open it up, right-click and select 'Open Link in New Tab' to not leave this page.)

To open up one's user control panel, go to the navbar at the top of any page on our forum and click your username. It'll display a drop-down menu where you can click 'User control panel'. Then click the second top tab 'Profile'.

Signatures appear at the bottom of your posts (if you have selected for it to do so). They can have text, links, smilies or images displayed in them. These are not something you need to have, but if you are interested in having one we'll go through what to do below.


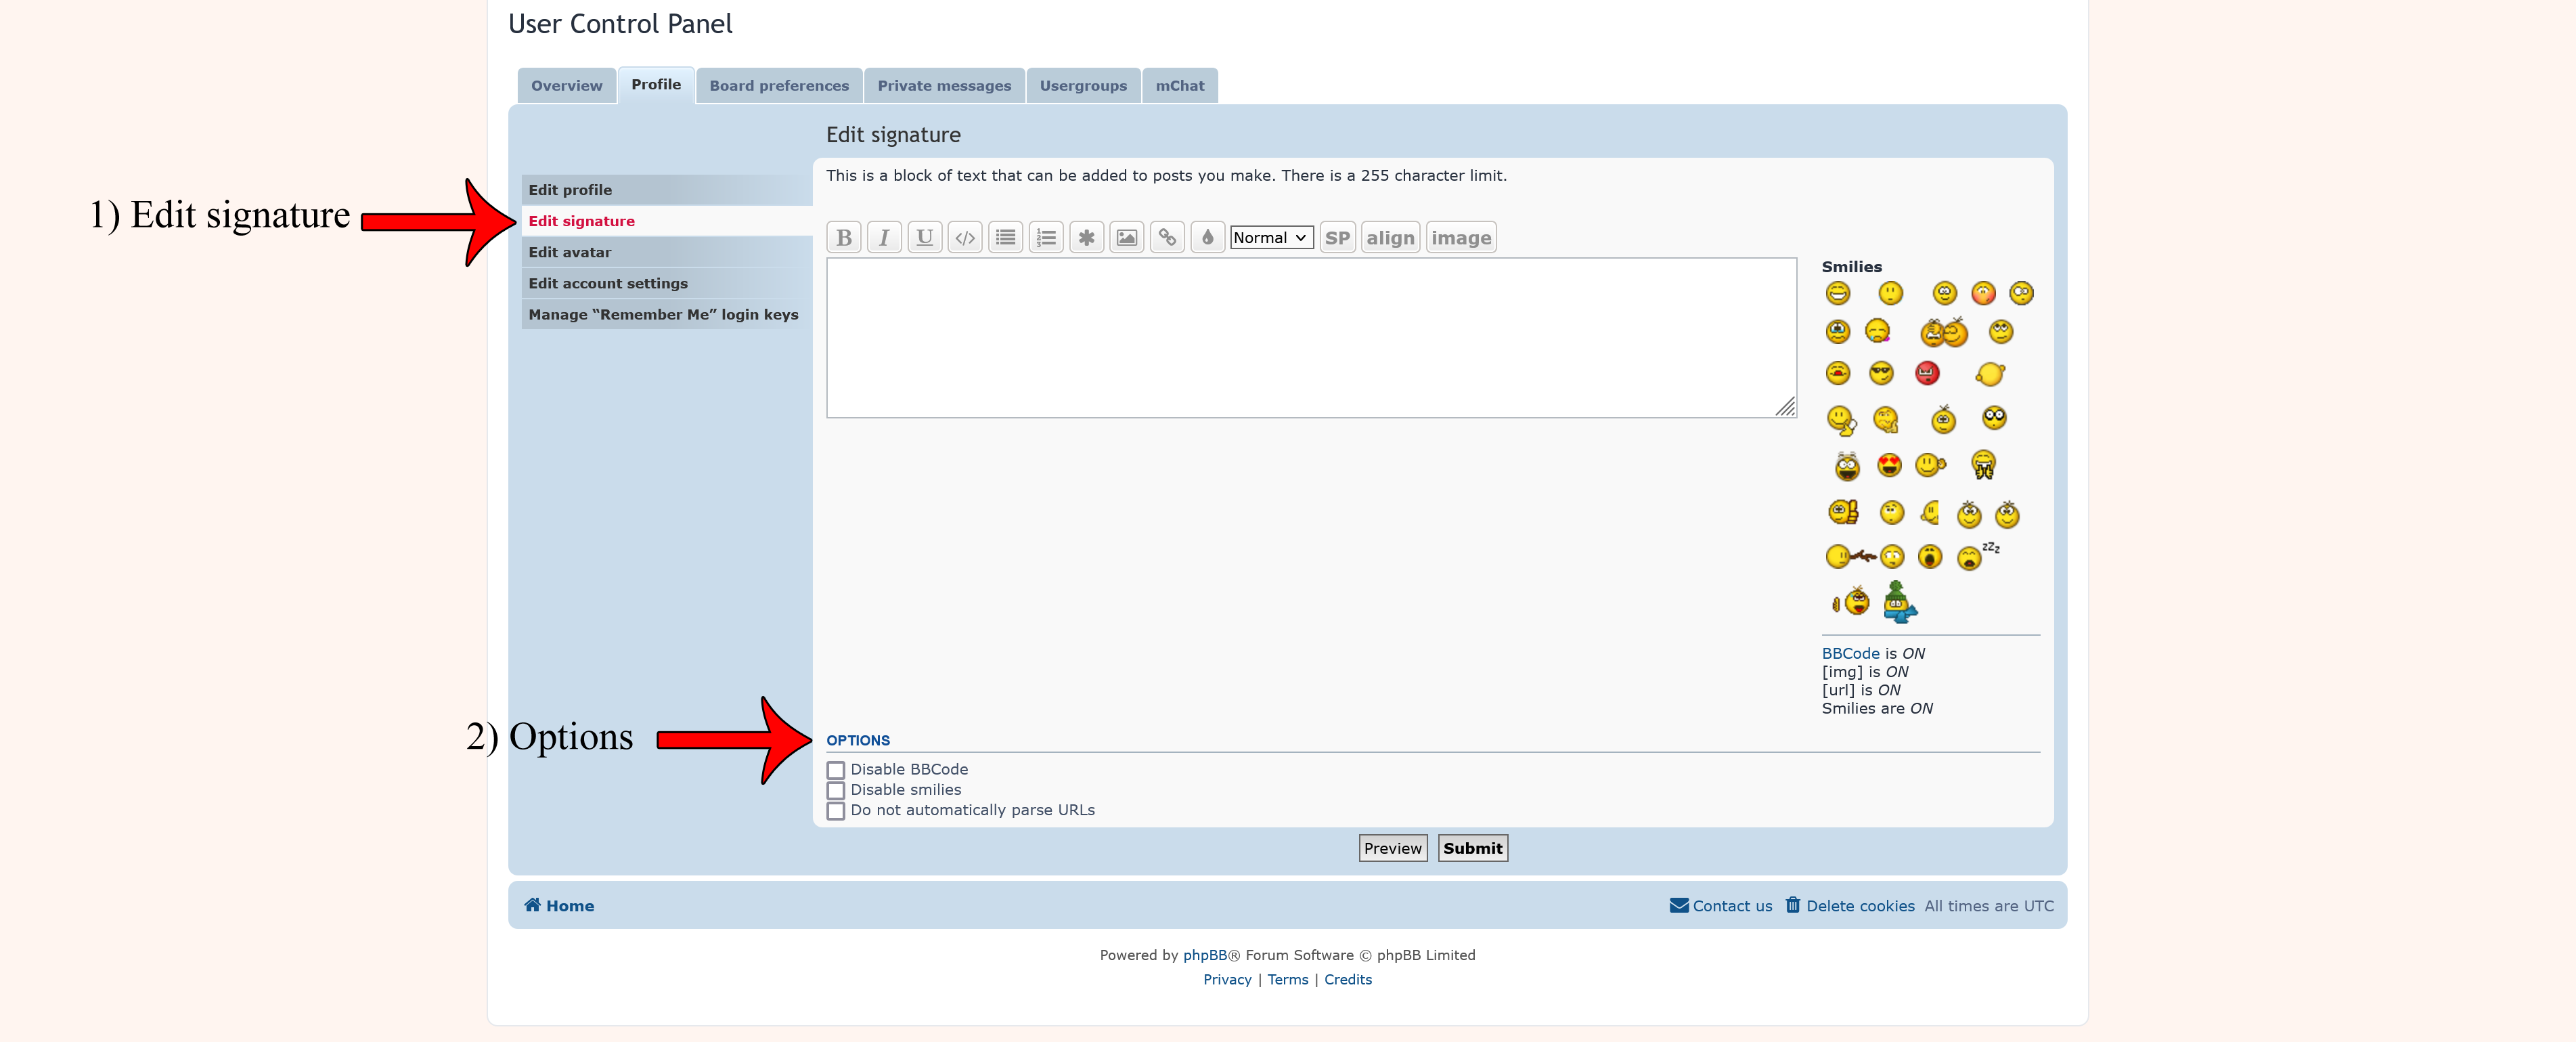
1) Edit Signature
This is the area where you can add or edit your signature. Much like a post or private message, you can have text, images, links or smilies displayed. Simply use the text box to input what you wish to have for your signature. You can see the BBCode (buttons above the text box) to help you style your text, add an image or link. Hover your mouse over any of the BBCode buttons to see what it does and how to make it work. For more help/information, see our BBCode Guide.

Adding smilies is simple, just click which smilies from the far right you wish to have and they will insert themselves into the text box.

Images - it's best to have your image uploaded online somewhere and simply link to it using BBCode. Need help finding a place to upload your images to online? Go to this guide here.

You can see how your signature looks while working on it by clicking the 'preview' button. Remember to click 'submit' to save any changes. When saved, your signature (if you have one) will appear above the text box and BBCode buttons.

2) Options
There are some options below for your signature. It's best to leave these alone as if you already have a signature with BBCode in, clicking 'Disable BBCode' will obviously mess up what your signature looks like.
User avatar
Emz
Admin & Founder
Admin & Founder
Posts: 95
Joined: Sun 10 Mar 2024, 5:39 pm
Full Name: Emily Radcliffe
Location: Maltby
Pronouns: She/Her
Contact:

Re: Guide - User Preferences & Settings

Post by Emz »

Edit Avatar


(Need a closer look? Clicking the image will open it up, right-click and select 'Open Link in New Tab' to not leave this page.)


To open up one's user control panel, go to the navbar at the top of any page on our forum and click your username. It'll display a drop-down menu where you can click 'User control panel'. Then click the second top tab 'Profile'.


Avatars
There are two ways you can upload an avatar to your profile, one with a URL link of an image. Two from the device you are using (computer, phone, tablet). Please note that the image can not be bigger than 150 pixels square in both height and width and the file size no larger than 6.00 KiB.
If your image is bigger than 150 pixels and/or 6.00 KiB, there are websites online that you can upload your image to and will make it smaller.

TinyPNG reduces file sizes.
PicResize can reduce the image pixel size, either from an image off your device or from a URL.

Avatars can be hard to find online, searching for 'avatar' or 'icon' (which they are sometimes called) and you get everything but what you want. If you are struggling to find one please go to our Avatars Topic where we have a bunch of ones you can choose from and copy and paste the URL into your profile.
User avatar
Emz
Admin & Founder
Admin & Founder
Posts: 95
Joined: Sun 10 Mar 2024, 5:39 pm
Full Name: Emily Radcliffe
Location: Maltby
Pronouns: She/Her
Contact:

Re: Guide - User Preferences & Settings

Post by Emz »

Account Settings


(Need a closer look? Clicking the image will open it up, right-click and select 'Open Link in New Tab' to not leave this page.)


To open up one's user control panel, go to the navbar at the top of any page on our forum and click your username. It'll display a drop-down menu where you can click 'User control panel'. Then click the second top tab 'Profile'.


Account Settings
Here you can change your email address and password if you ever need to. To change one or both of these you will need to enter your 'Current password' (located just above the submit button) and click submit.
User avatar
Emz
Admin & Founder
Admin & Founder
Posts: 95
Joined: Sun 10 Mar 2024, 5:39 pm
Full Name: Emily Radcliffe
Location: Maltby
Pronouns: She/Her
Contact:

Re: Guide - User Preferences & Settings

Post by Emz »

Remember Me Login


(Need a closer look? Clicking the image will open it up, right-click and select 'Open Link in New Tab' to not leave this page.)


To open up one's user control panel, go to the navbar at the top of any page on our forum and click your username. It'll display a drop-down menu where you can click 'User control panel'. Then click the second top tab 'Profile'.


Remember Me
If you haven't noticed before, when you go to login you have the option to select 'remember me'. Selecting this means the forum will likely remember your login details and automatically log you in when you return.
In the image above is where in your user control panel that information is stored. If you haven't used the 'remember me' option nothing will appear here, if you have you will see something similar to what the downward arrow is pointing at. It's here you can select any or all of your 'remember me' to delete them if you so wish.
User avatar
Emz
Admin & Founder
Admin & Founder
Posts: 95
Joined: Sun 10 Mar 2024, 5:39 pm
Full Name: Emily Radcliffe
Location: Maltby
Pronouns: She/Her
Contact:

Re: Guide - User Preferences & Settings

Post by Emz »

Edit Global Settings


(Need a closer look? Clicking the image will open it up, right-click and select 'Open Link in New Tab' to not leave this page.)


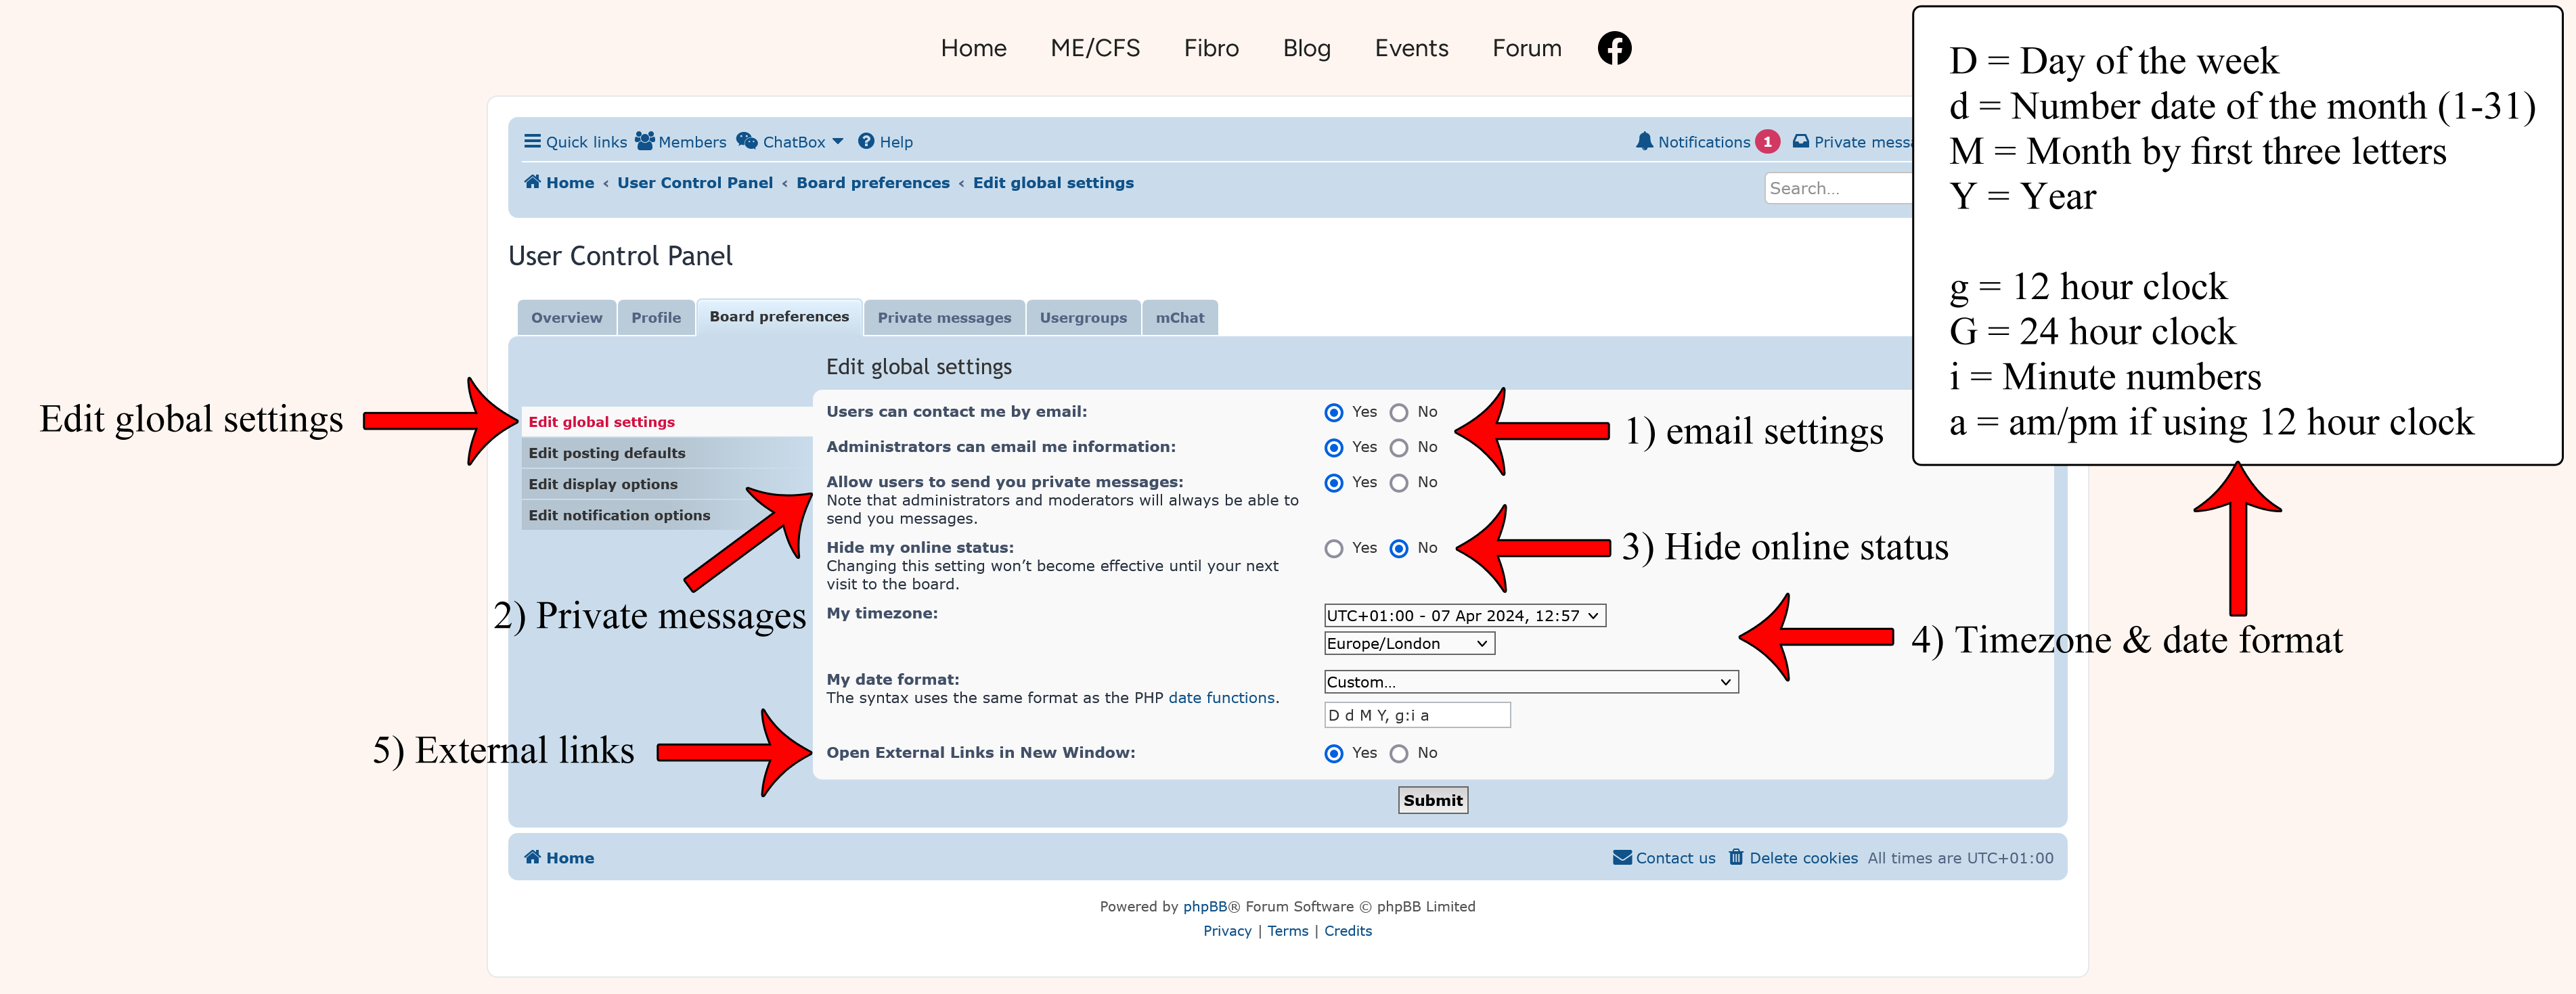
To open up one's user control panel, go to the navbar at the top of any page on our forum and click your username. It'll display a drop-down menu where you can click 'User control panel'. Then click the third top tab 'Board preferences'.


1) Email Settings
Here you can select yes or no if other members of the forum and administrator/s can email you. It is best to allow the admin the ability to email you in case there's a problem with your account or that of the forum itself.


2) Private Messages
Here you can select yes or no if you wish to allow other members of the forum the ability to private message you. For more information on private messages please see this guide.


3) Hide Online Status
On the index/home page of our forum we have a forum stats at the bottom of the place which tells you who is currently online. If you wish to be hidden from this list select 'yes' here. Please note changing this setting won’t become effective until your next visit and that administrators can always see who is online, hidden or not.


4) Timezone & Date Format
You will not need to change the timezone as it is already set for London. The date format is what you will see on the forum, it is mostly used for showing when topics/posts where published.
Image
Here is an example of a 'last post' from the index/home page, see how it mentions the topic name, post author and then the date format underneath. The way the date is seen can be edited to your liking. Clicking the drop-down menu you can select one of the options or custom if you wish to have it another way not listed. Selecting custom will make another box appear underneath where you can rearrange the letters to the date format you want.

What does 'D d M Y, g:i a' mean?

D = Day of the week
d = Number date of the month (1-31)
M = Month by first three letters
Y = Year

g = 12 hour clock
G = 24 hour clock
i = Minute numbers
a = am/pm if using 12 hour clock

Please remember if doing a custom date format to include any commas or colons and click submit to save your settings.


5) External Links
External links are any links that take you away from the Nightingales website/forum, for example, Facebook. You can select yes or no if you wish for these links to open up a new tab/window so you don't lose your place on the forum.
User avatar
Emz
Admin & Founder
Admin & Founder
Posts: 95
Joined: Sun 10 Mar 2024, 5:39 pm
Full Name: Emily Radcliffe
Location: Maltby
Pronouns: She/Her
Contact:

Re: Guide - User Preferences & Settings

Post by Emz »

Edit Posting Defaults


(Need a closer look? Clicking the image will open it up, right-click and select 'Open Link in New Tab' to not leave this page.)


To open up one's user control panel, go to the navbar at the top of any page on our forum and click your username. It'll display a drop-down menu where you can click 'User control panel'. Then click the third top tab 'Board preferences'.


BBCode & Smilies
It's best to keep these as both 'yes'. I see no reason why one would select no for these two. BBCode is basically how you style your text in any post, signature etc (eg bold, italic, enlarged text) and is also how you insert/add particular things like links and images.


Attach Signature & Notify Me
These two you may wish to change depending on your preferences.
Attach my signature by default - any post you make will automatically attach any signature you may have. But you can change this before submitting any post in the 'options' area.
Notify me upon replies by default - This will automatically alert you should any replies happen in a topic/thread you have posted in. Just like with the signature, there is an option before submitting any post where you can tick to be alerted of posts or untick (if this is 'yes' in your posting defaults) to not be alerted.
User avatar
Emz
Admin & Founder
Admin & Founder
Posts: 95
Joined: Sun 10 Mar 2024, 5:39 pm
Full Name: Emily Radcliffe
Location: Maltby
Pronouns: She/Her
Contact:

Re: Guide - User Preferences & Settings

Post by Emz »

Edit Display Options


(Need a closer look? Clicking the image will open it up, right-click and select 'Open Link in New Tab' to not leave this page.)


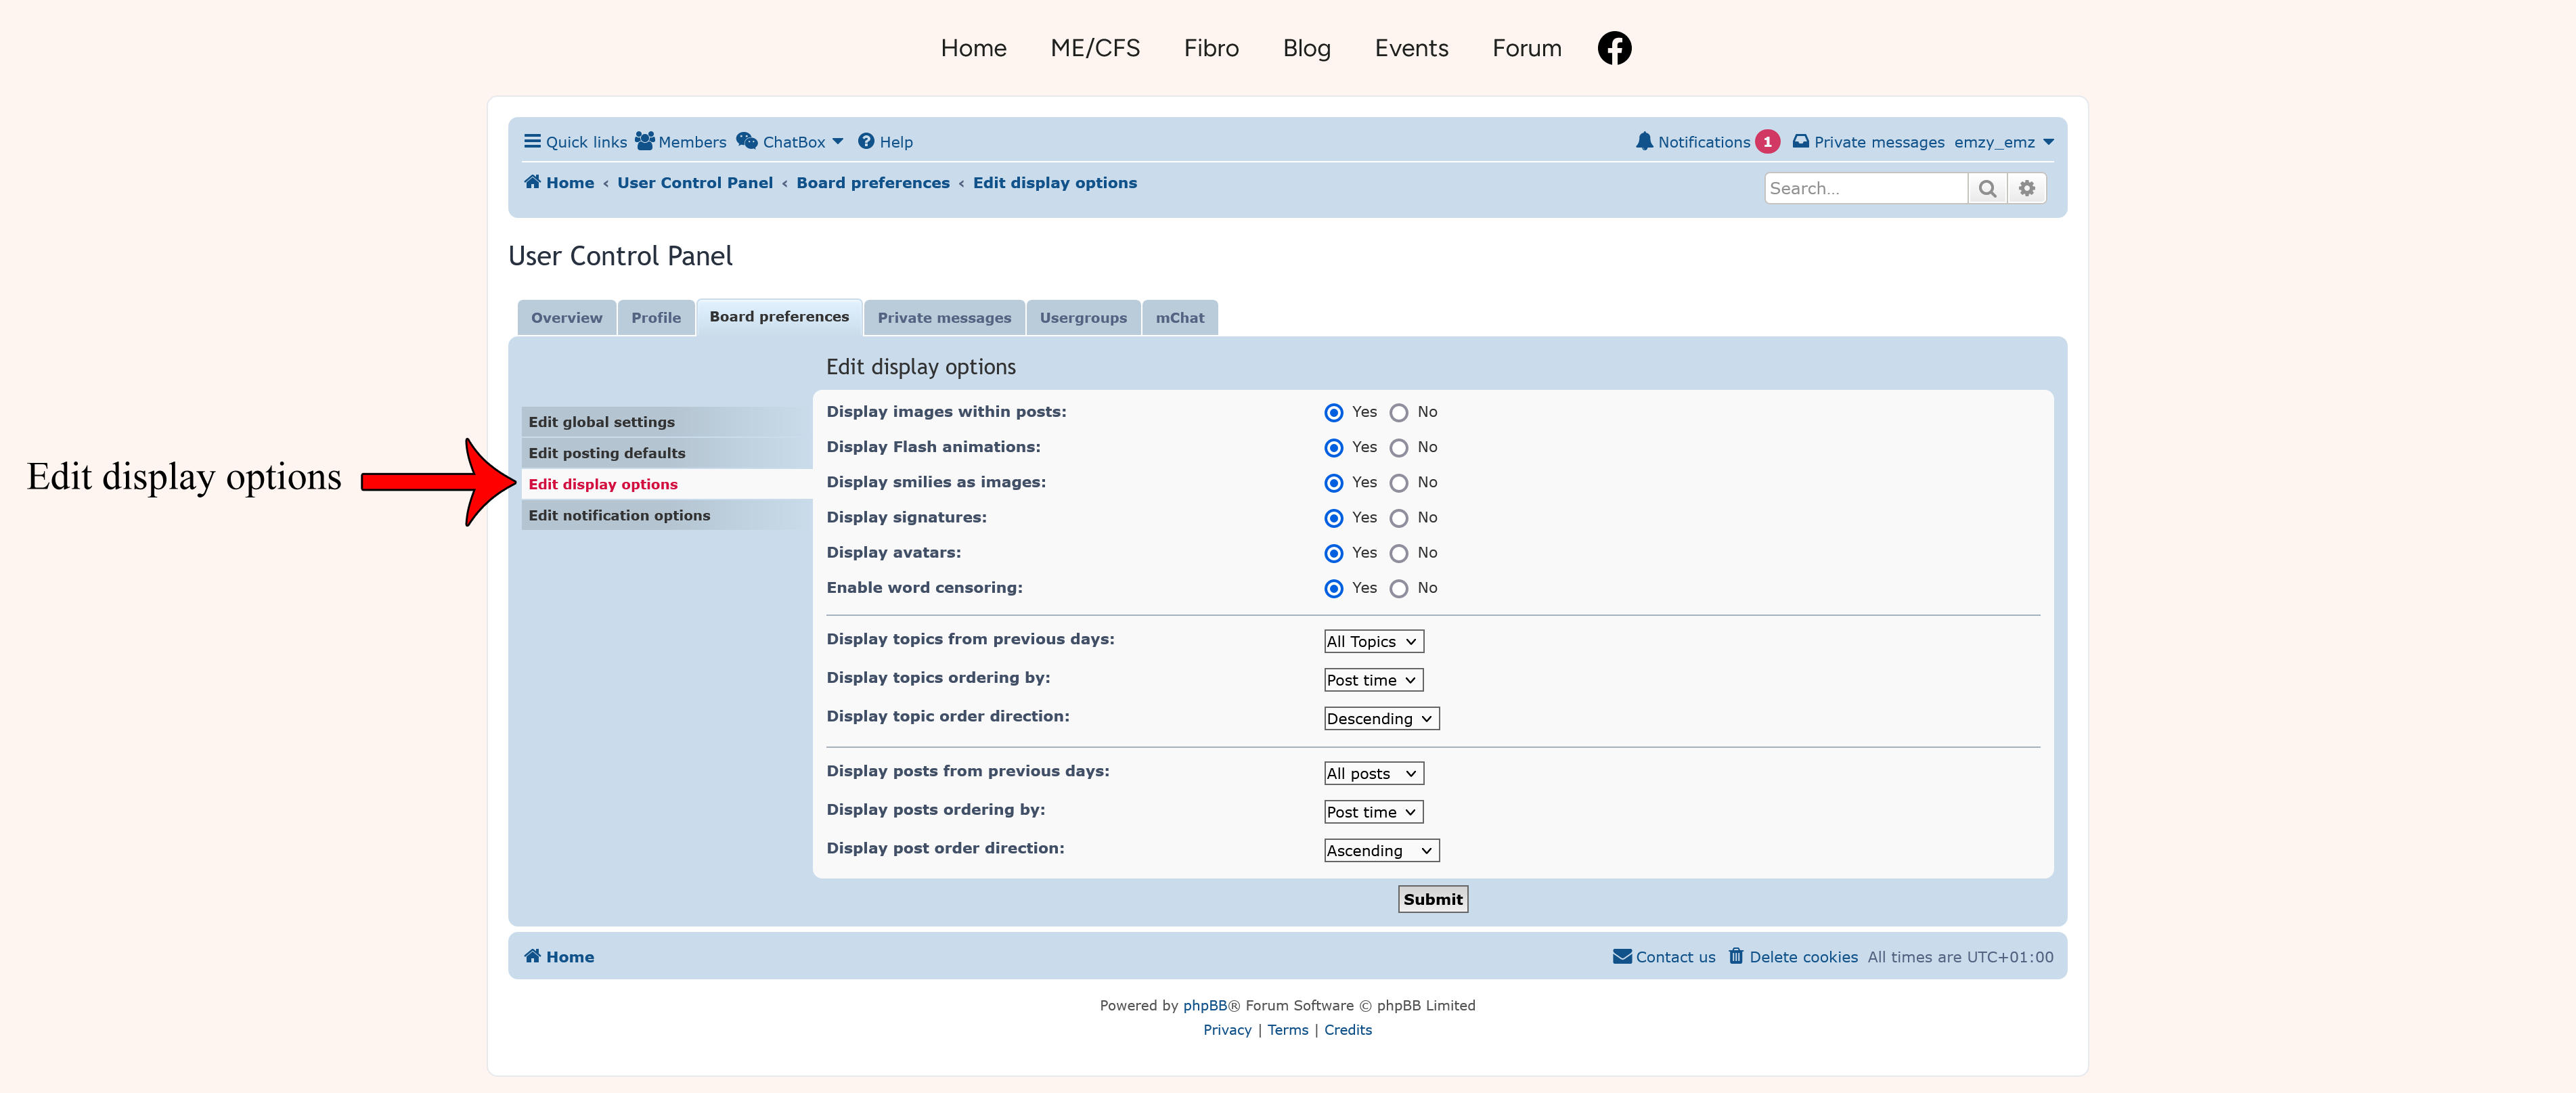
To open up one's user control panel, go to the navbar at the top of any page on our forum and click your username. It'll display a drop-down menu where you can click 'User control panel'. Then click the third top tab 'Board preferences'.


Display Options
It is recommended to leave these options/settings as they are, the only things you may wish to change yourself are 'word censoring'. For those knowing more about forums and having particular preferences when it comes to forums, you may wish to edit how topics or posts are displayed. If you choose to change these I assume you know what you are doing and do not need a guide.
Locked