Guide - Posting
Great for first time forum users or a refresher.
- Emz
- Admin & Founder
- Posts: 95
- Joined: Sun 10 Mar 2024, 5:39 pm
- Full Name: Emily Radcliffe
- Location: Maltby
- Pronouns: She/Her
- About Me: Link
- Contact:
Guide - Posting
You have a choice to either watch our video talking you through everything you need to know about posting or scroll down to click and read which areas you wish to learn about (with helpful images showing what we are talking about). Both have the same information.
{ INSERT VIDEO HERE }
Posting - Quick Links
1) Start a New Topic, Post a Reply & Quick Reply
2) Posting Area
3) Editing/Deleting a Post
4) Creating a Poll
5) Quoting a Post
6) Linking to a Post
- Emz
- Admin & Founder
- Posts: 95
- Joined: Sun 10 Mar 2024, 5:39 pm
- Full Name: Emily Radcliffe
- Location: Maltby
- Pronouns: She/Her
- About Me: Link
- Contact:
Re: Guide - Posting
Start a New Topic, Post a Reply & Quick Reply
(Need a closer look? Clicking the image will open it up, right-click and select 'Open Link in New Tab' to not leave this page.)
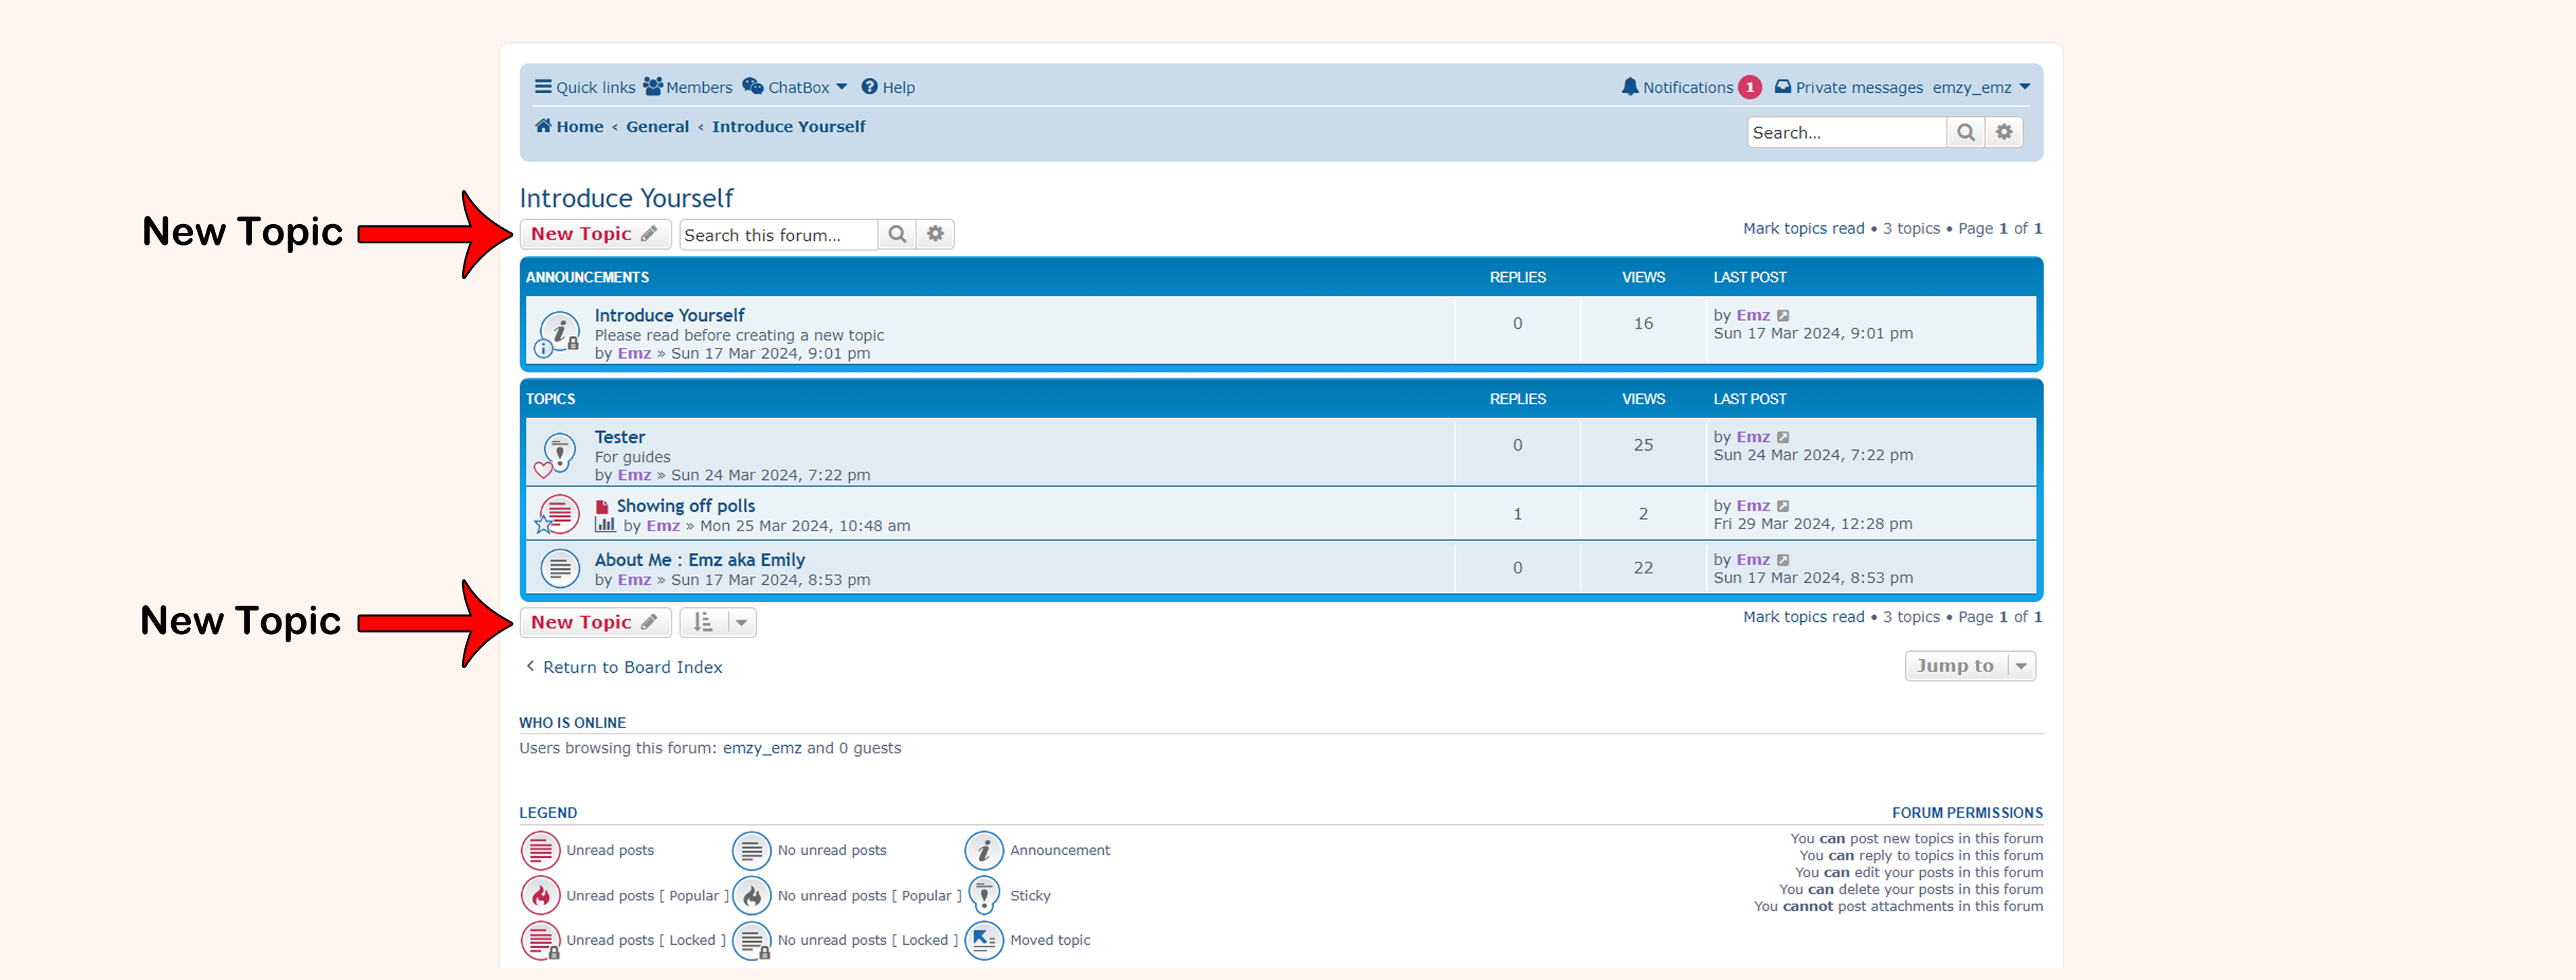
Whilst in a forum/board or a sub of one, you will see a button at the top and bottom of all the topics/threads already in that area entitled 'New Topic'. Clicking this will open up the posting area enabling you to start a new topic in that area.
Please note, not all registered members can start new topics/threads in every area of our Nightingales Forum. For example, in 'Guides' only admin can start new topics.
(Need a closer look? Clicking the image will open it up, right-click and select 'Open Link in New Tab' to not leave this page.)
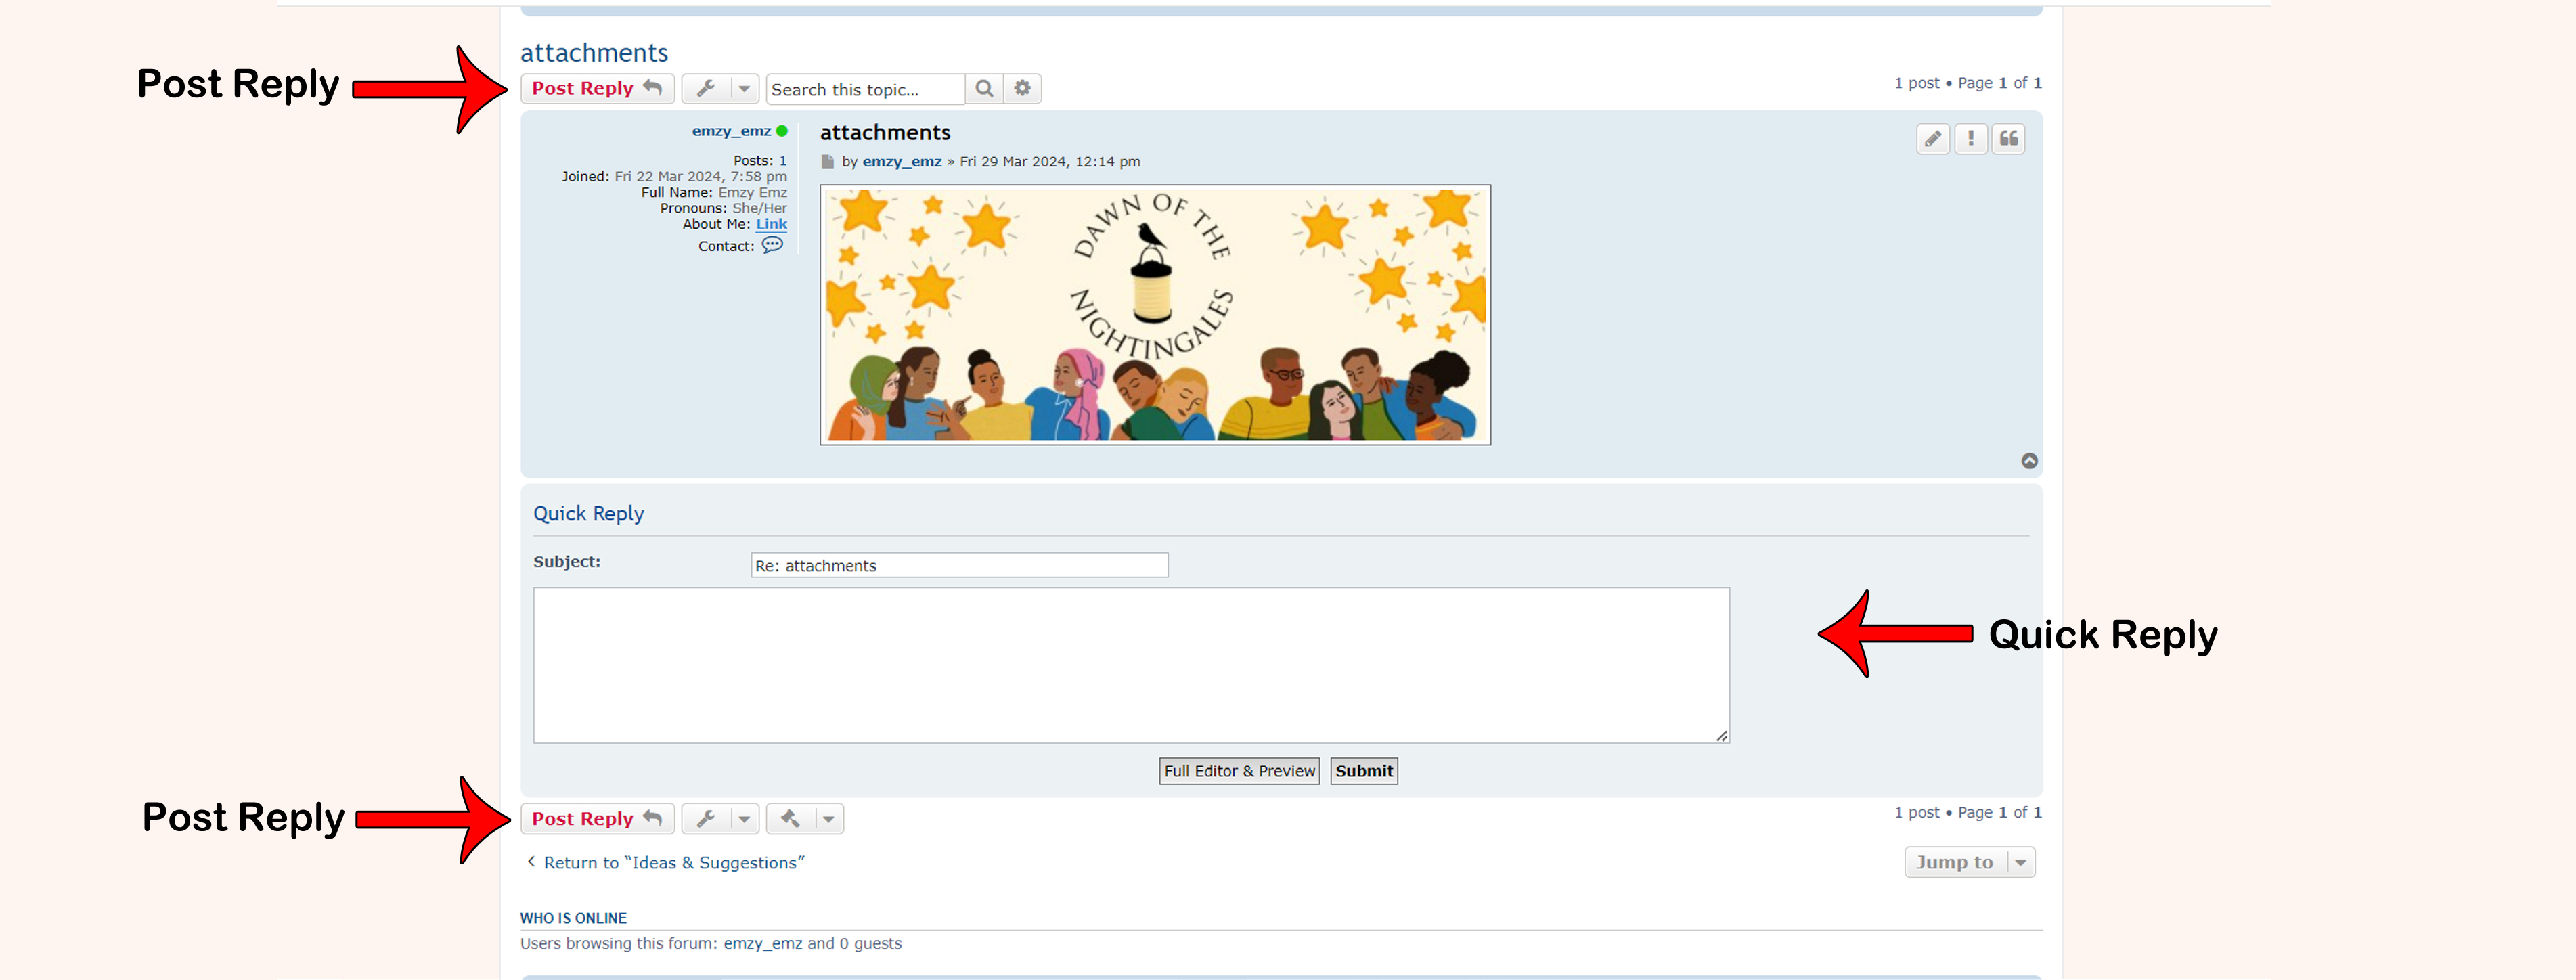
Whilst in a topic/thread you will have the ability to post a reply (unless that topic/thread is locked). You have two different ways to go about this.
1) Click the 'Post Reply' button which can be found at the top and bottom of each page of the topic/thread you are in. This will take you to the posting area with the ability to use BBCode and Smilies.
2) Type your reply in the 'Quick Reply' text box. Please note the quick reply only appears on the last page of the topic/thread. You also cannot use BBCode or Smilies in quick reply. Clicking 'Full Editor & Preview' will take you to the posting area. 'Submit' will post your quick reply.
(Need a closer look? Clicking the image will open it up, right-click and select 'Open Link in New Tab' to not leave this page.)
Whilst in a forum/board or a sub of one, you will see a button at the top and bottom of all the topics/threads already in that area entitled 'New Topic'. Clicking this will open up the posting area enabling you to start a new topic in that area.
Please note, not all registered members can start new topics/threads in every area of our Nightingales Forum. For example, in 'Guides' only admin can start new topics.
(Need a closer look? Clicking the image will open it up, right-click and select 'Open Link in New Tab' to not leave this page.)
Whilst in a topic/thread you will have the ability to post a reply (unless that topic/thread is locked). You have two different ways to go about this.
1) Click the 'Post Reply' button which can be found at the top and bottom of each page of the topic/thread you are in. This will take you to the posting area with the ability to use BBCode and Smilies.
2) Type your reply in the 'Quick Reply' text box. Please note the quick reply only appears on the last page of the topic/thread. You also cannot use BBCode or Smilies in quick reply. Clicking 'Full Editor & Preview' will take you to the posting area. 'Submit' will post your quick reply.
- Emz
- Admin & Founder
- Posts: 95
- Joined: Sun 10 Mar 2024, 5:39 pm
- Full Name: Emily Radcliffe
- Location: Maltby
- Pronouns: She/Her
- About Me: Link
- Contact:
Re: Guide - Posting
Posting Area
(Need a closer look? Clicking the image will open it up, right-click and select 'Open Link in New Tab' to not leave this page.)
Whether you are starting a new topic or posting a reply you will be taken to the posting area. There's only some slight differences between the two. As you can see in the image above, starting a new topic will allow you to name the topic and if you wish to, add a description of the topic. This can be handy for people scrolling/looking through threads to get a better idea on what the topic is about.
For example, you could name your topic 'Pets', with the description being 'Talk and post pics of your fluffy friends!'
When posting a reply (see red boxed area in image above) you'll notice that the subject is 'Re:' and whatever the topic is called. So there's no need to come up with a subject title here.
You also have the option in both to select an icon but this is not needed and can be left alone.
1) Text Box & Smilies
I think we are all familiar with text boxes and what to do with them. This area is where you type what you wish to say.
Above the text box area are a row of buttons allowing you to use BBCode in your post. BBCode is used on forums to make text look a particular way (bold, coloured text etc) or to add things to your post like that of images. For more information about BBCode and how to use it please see our BBCode Guide.
You'll notice at the right side of this text box there are smilies which can be clicked and automatically added to your text box. Underneath the smilies is letting you know whether things are on or off for your posting. It's best to keep these all 'on' so any added BBCode, smilies, images etc show up in your post.
2) Options
This area can mostly be left as it is but there are a couple options in this area you may wish to tick/untick.
1) Attach a signature
If you don't have a signature then you can ignore this. Those that do have the option of whether their signature will appear at the bottom of their post.
2) Notify me when a reply is posted
This can be handy if you wish to keep an eye on the topic you have started/are posting to without having to keep checking back. Depending on your notifications settings in your user control panel, you will either get notified by the forum itself when you are on or by email.
For more information about this please look at our Subscriptions & Bookmarks guide.
3) Buttons
Lastly we have the main buttons. You can load a draft you have already saved and wish to use, save the current post you are working on. (For more information on drafts see another post in this guide).
Preview your post, which is handy when using BBCode to make sure it all looks as it should, enabling you to edit/change anything that doesn't look right. (The page will load and show a preview of your post above the posting area.)
Finally, the submit button will post your new topic/reply.
- Emz
- Admin & Founder
- Posts: 95
- Joined: Sun 10 Mar 2024, 5:39 pm
- Full Name: Emily Radcliffe
- Location: Maltby
- Pronouns: She/Her
- About Me: Link
- Contact:
Re: Guide - Posting
Editing/Deleting A Post
(Need a closer look? Clicking the image will open it up, right-click and select 'Open Link in New Tab' to not leave this page.)
1) Editing a Post
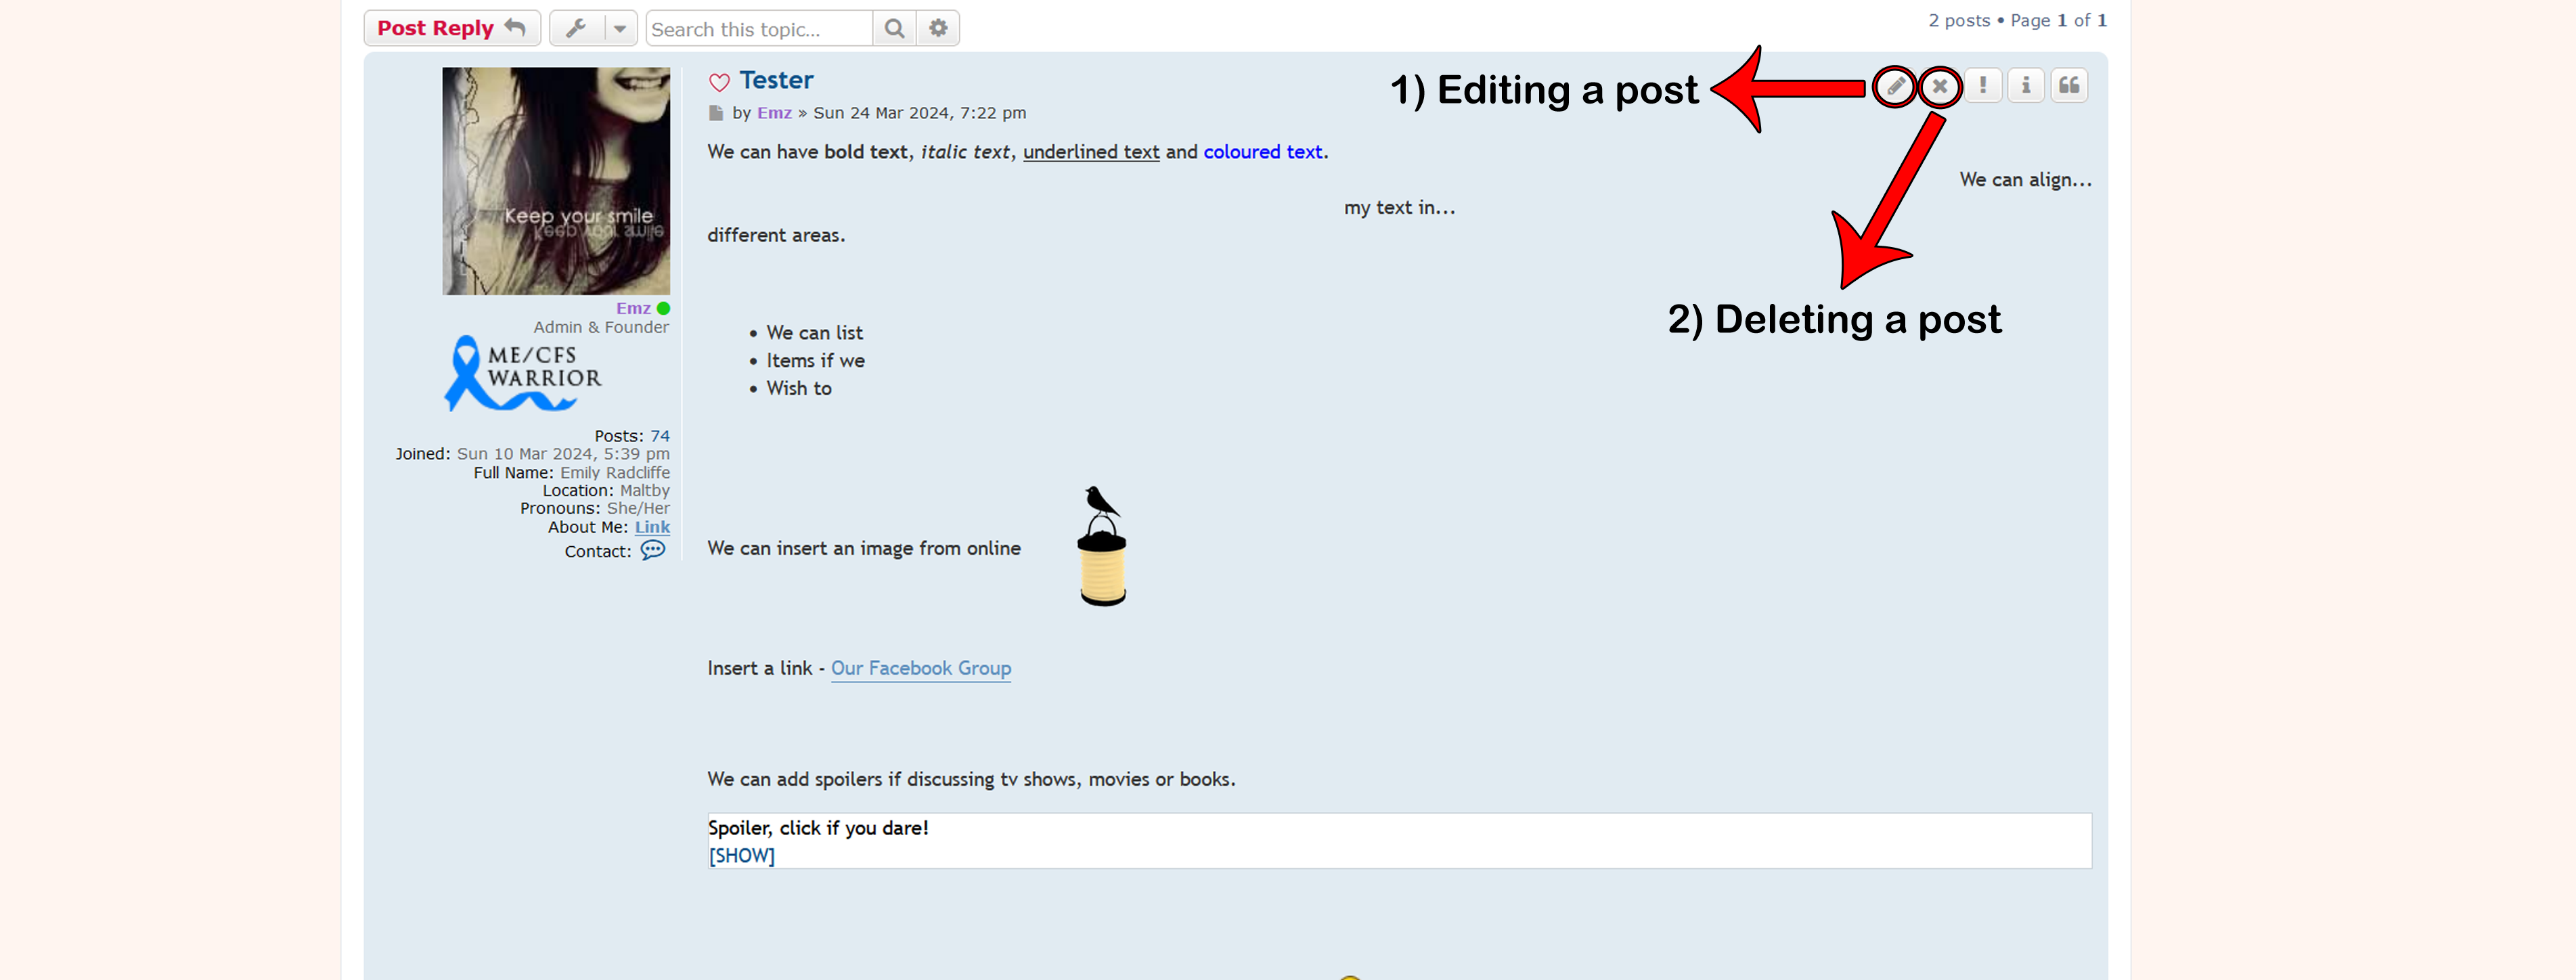
It's very simple to edit a post after it's been posted. You will notice a little pencil symbol at the top right-hand corner of your post. Clicking this will take you to the posting area with your post in the text box ready to edit. Once you have made the changes or added to your post, click submit to save the changes.
2) Deleting a Post
Members will not always be able to delete their posts. But when you can, you will notice at the top right corner of each of your posts a 'x' symbol. Clicking this will delete your post.
- Emz
- Admin & Founder
- Posts: 95
- Joined: Sun 10 Mar 2024, 5:39 pm
- Full Name: Emily Radcliffe
- Location: Maltby
- Pronouns: She/Her
- About Me: Link
- Contact:
Re: Guide - Posting
Creating A Poll
(Need a closer look? Clicking the image will open it up, right-click and select 'Open Link in New Tab' to not leave this page.)
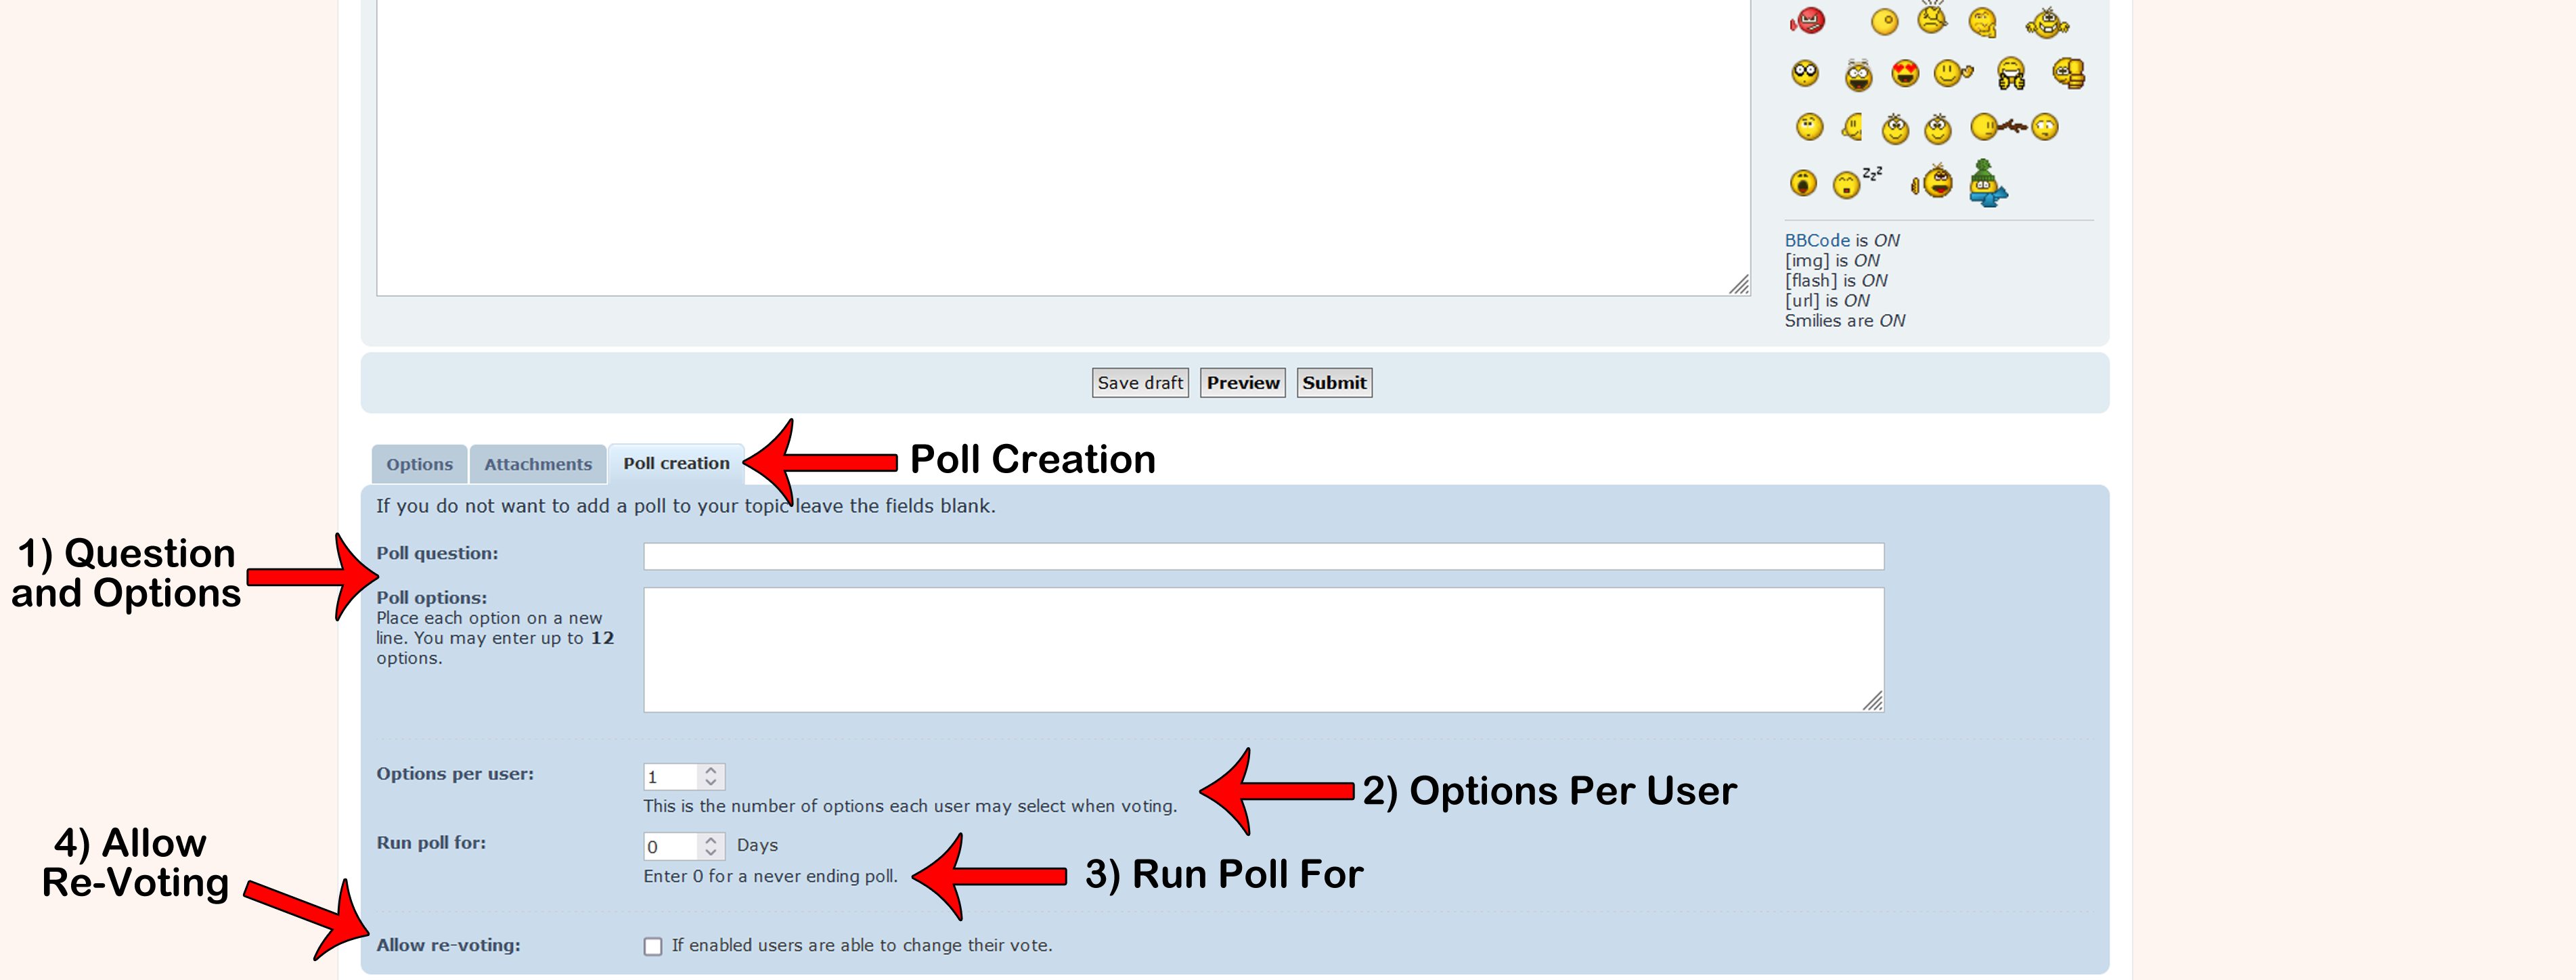
In some forum/board or a sub of one members will have the ability to create a poll. To do so, start a new topic, creating a title for the topic and whatever information etc you wish in the text box. Scrolling down you will some tabbed boxes. Click 'Poll creation'
1) Question & Options
Input your poll question and the options people can choose from. Each possible answer must be on a new line and you are only allowed up to twelve in total.
2) Options Per User
This will automatically be set as '1' but if you wish for members to be able to select multiple options/answers, readjust this.
3) Run Poll For
This will automatically be '0' for a never-ending poll. If you wish for this poll to only last a few days before it is closed off from being answered, change it to the number of days you wish for it to be opened for.
4) Allow Re-Voting
If you wish for members to be able to change their mind and reanswer/change their answer/s then click this box.
Your poll is now ready! Click preview to make sure everything is as it should be before finally clicking 'submit' to post your new poll.
- Emz
- Admin & Founder
- Posts: 95
- Joined: Sun 10 Mar 2024, 5:39 pm
- Full Name: Emily Radcliffe
- Location: Maltby
- Pronouns: She/Her
- About Me: Link
- Contact:
Re: Guide - Posting
Quoting A Post
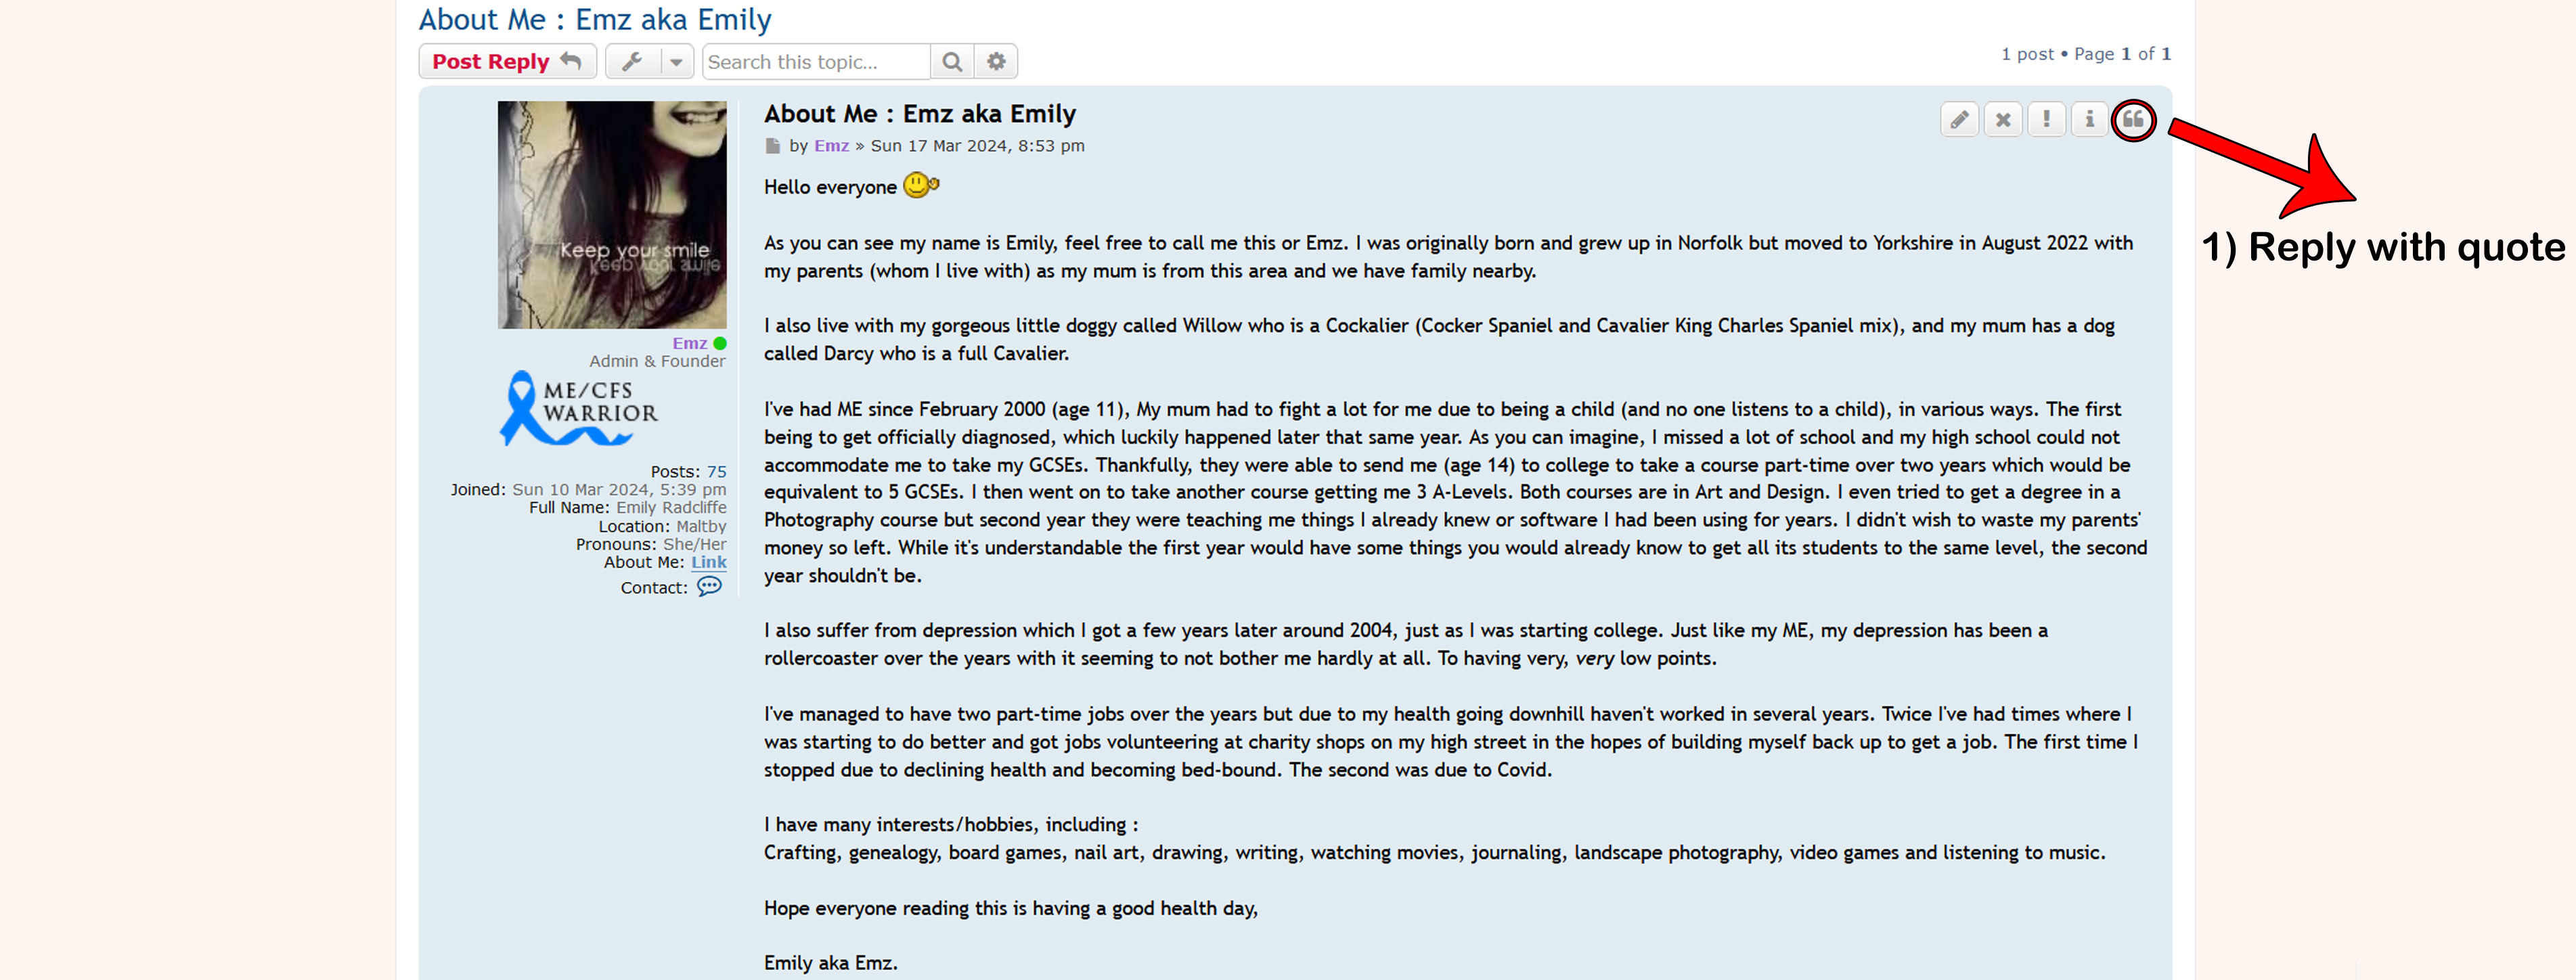
(Need a closer look? Clicking the image will open it up, right-click and select 'Open Link in New Tab' to not leave this page.)
When reading a topic/thread you might come across a post (whether it be new or old) and wish to quote it in your reply. This is possible by clicking the circled button in the image above. This will open up the posting area you get whenever you post a new topic or reply. But instead of the text box being blank it will have in
with the username following the = after that will be the post and user id in order to quote the post. You will notice the familiar text of the post in question after this and the whole thing will end with
You could always take out some of the text you are quoting, lets say you just wanted one line/sentence, find that and delete the bits before and after while keeping the code of the around the quoted post.
You can add your own post/text after the [/quote] part. Remember to check over your post in preview before submitting it.
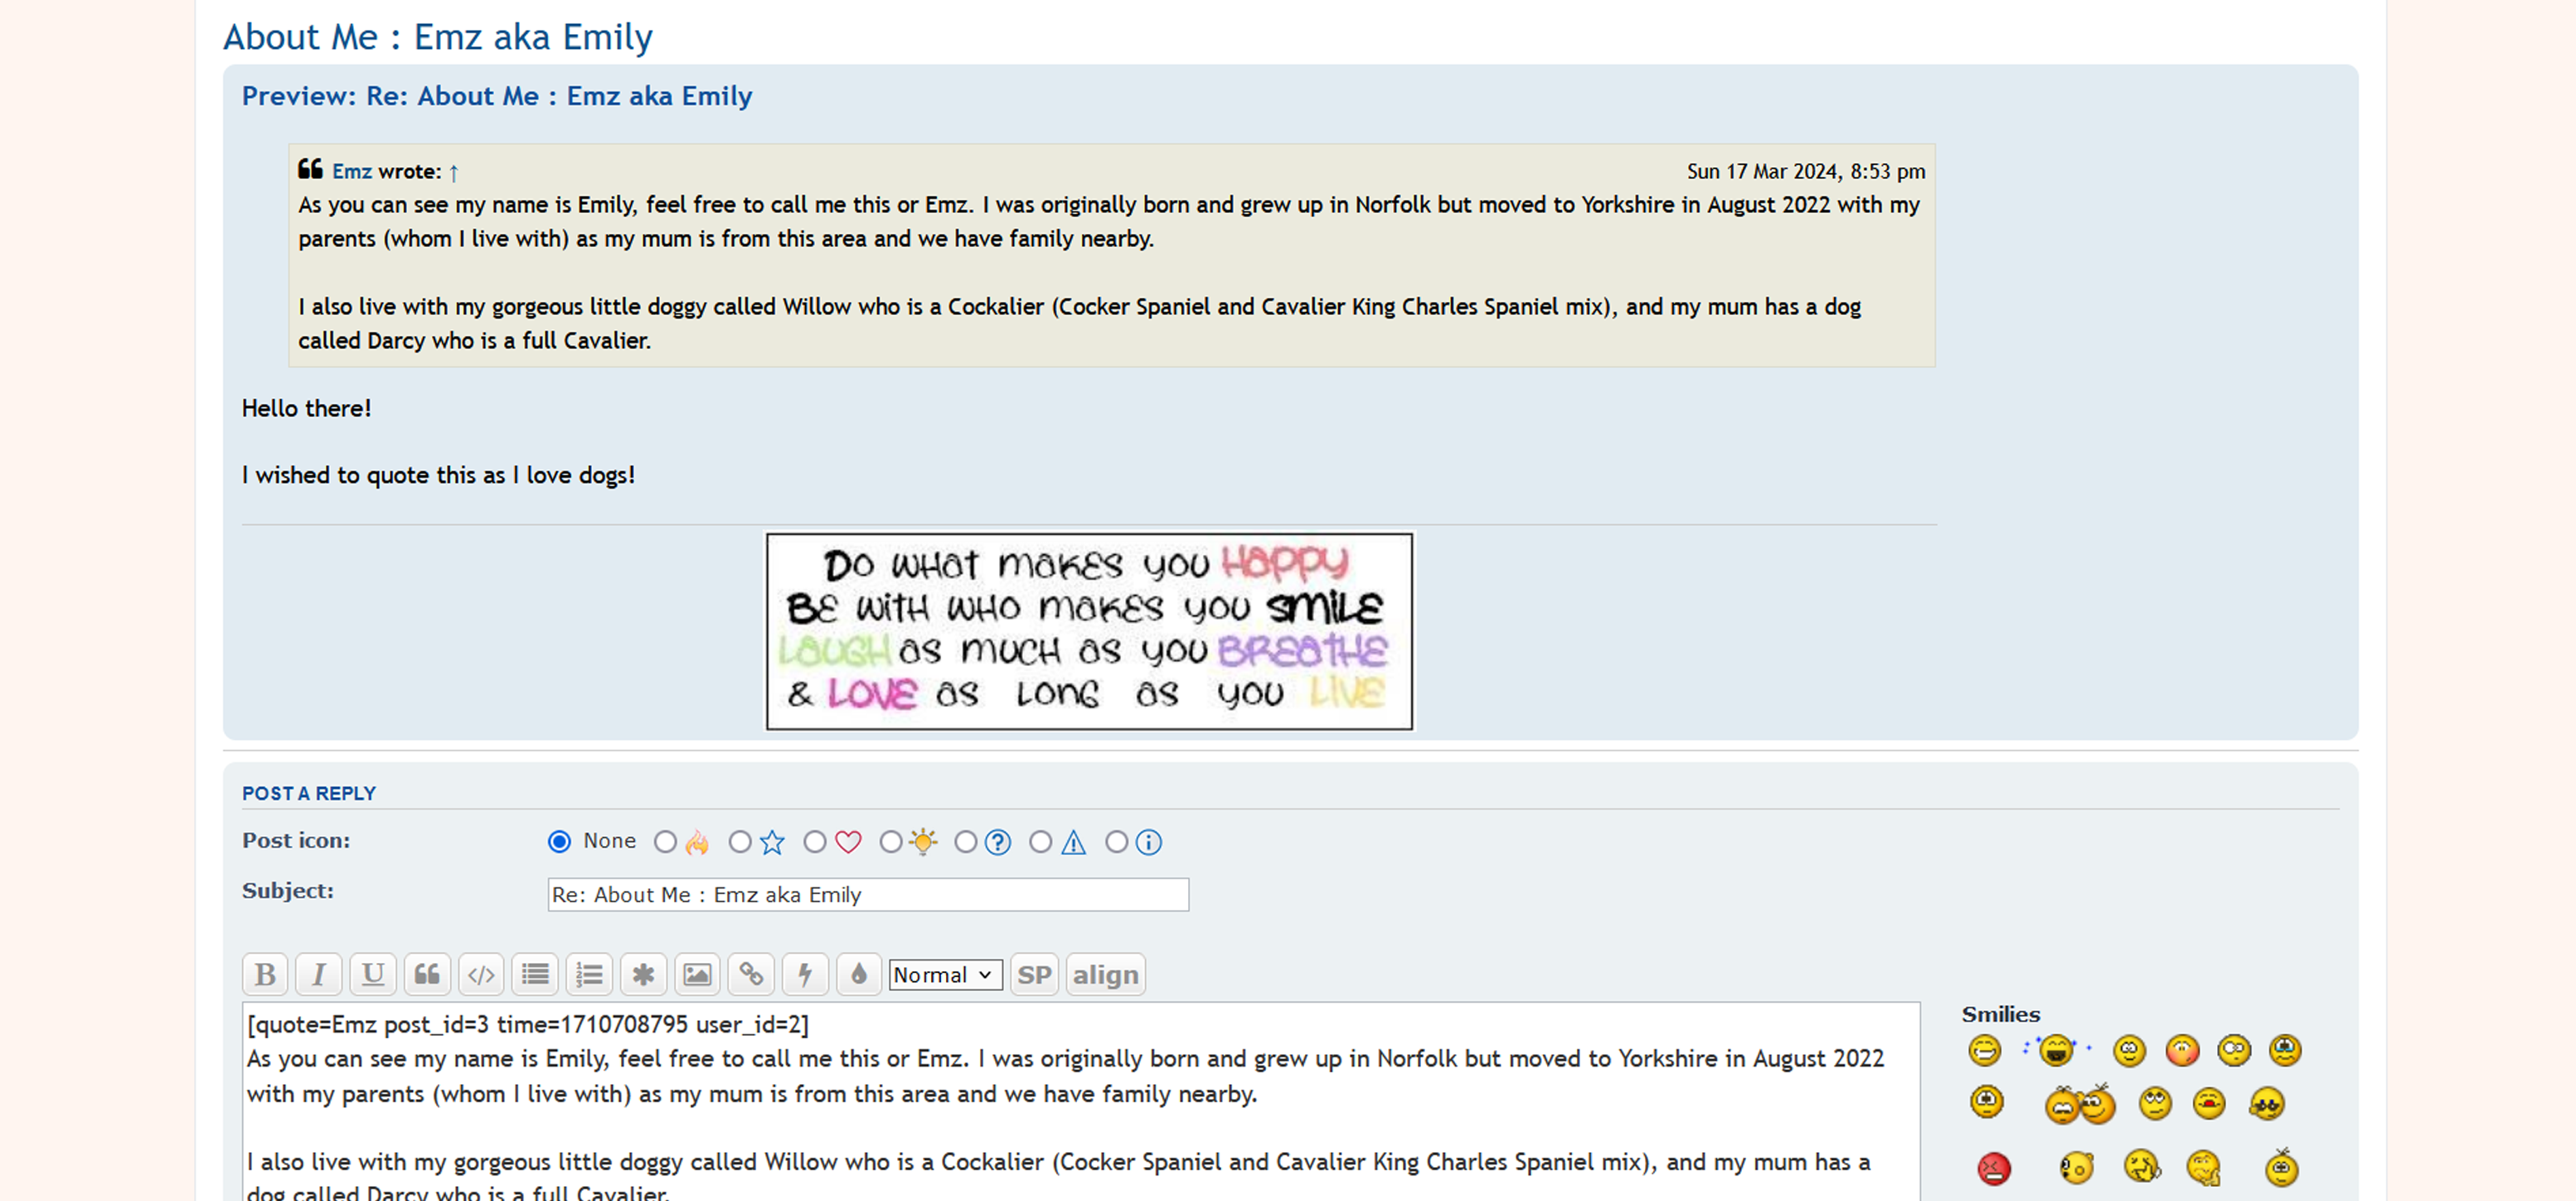
In preview mode you should see this :
Quoting Mulitple Posts
Just in case anyone is interested or wanting to know how to quote multiple posts, you basically do what is said above. This is no easy or quick way of getting multiple together.
So you will have to click on the circled button to quote each post. Let's say there are three you wish to quote. Click the button on the first, copy the text area where the quote has appeared, and paste it into a word doc or a separate tab that is already open and ready to reply to the topic. Next, go and find the second and third posts to quote, clicking the quote button to copy the coded quote and paste it into your word doc or separate tab.
Now you can add any additional text you wish to say, add to the reply. Or edit the quoted sections if you just wanted to quote a particular line from each one. Remember to preview so it all looks okay before posting.
(Need a closer look? Clicking the image will open it up, right-click and select 'Open Link in New Tab' to not leave this page.)
When reading a topic/thread you might come across a post (whether it be new or old) and wish to quote it in your reply. This is possible by clicking the circled button in the image above. This will open up the posting area you get whenever you post a new topic or reply. But instead of the text box being blank it will have in
Code: Select all
[quote=
Code: Select all
[/quote]
Code: Select all
[quote=......[/quote]
You can add your own post/text after the [/quote] part. Remember to check over your post in preview before submitting it.
In preview mode you should see this :
Quoting Mulitple Posts
Just in case anyone is interested or wanting to know how to quote multiple posts, you basically do what is said above. This is no easy or quick way of getting multiple together.
So you will have to click on the circled button to quote each post. Let's say there are three you wish to quote. Click the button on the first, copy the text area where the quote has appeared, and paste it into a word doc or a separate tab that is already open and ready to reply to the topic. Next, go and find the second and third posts to quote, clicking the quote button to copy the coded quote and paste it into your word doc or separate tab.
Now you can add any additional text you wish to say, add to the reply. Or edit the quoted sections if you just wanted to quote a particular line from each one. Remember to preview so it all looks okay before posting.
- Emz
- Admin & Founder
- Posts: 95
- Joined: Sun 10 Mar 2024, 5:39 pm
- Full Name: Emily Radcliffe
- Location: Maltby
- Pronouns: She/Her
- About Me: Link
- Contact:
Re: Guide - Posting
Linking To A Post
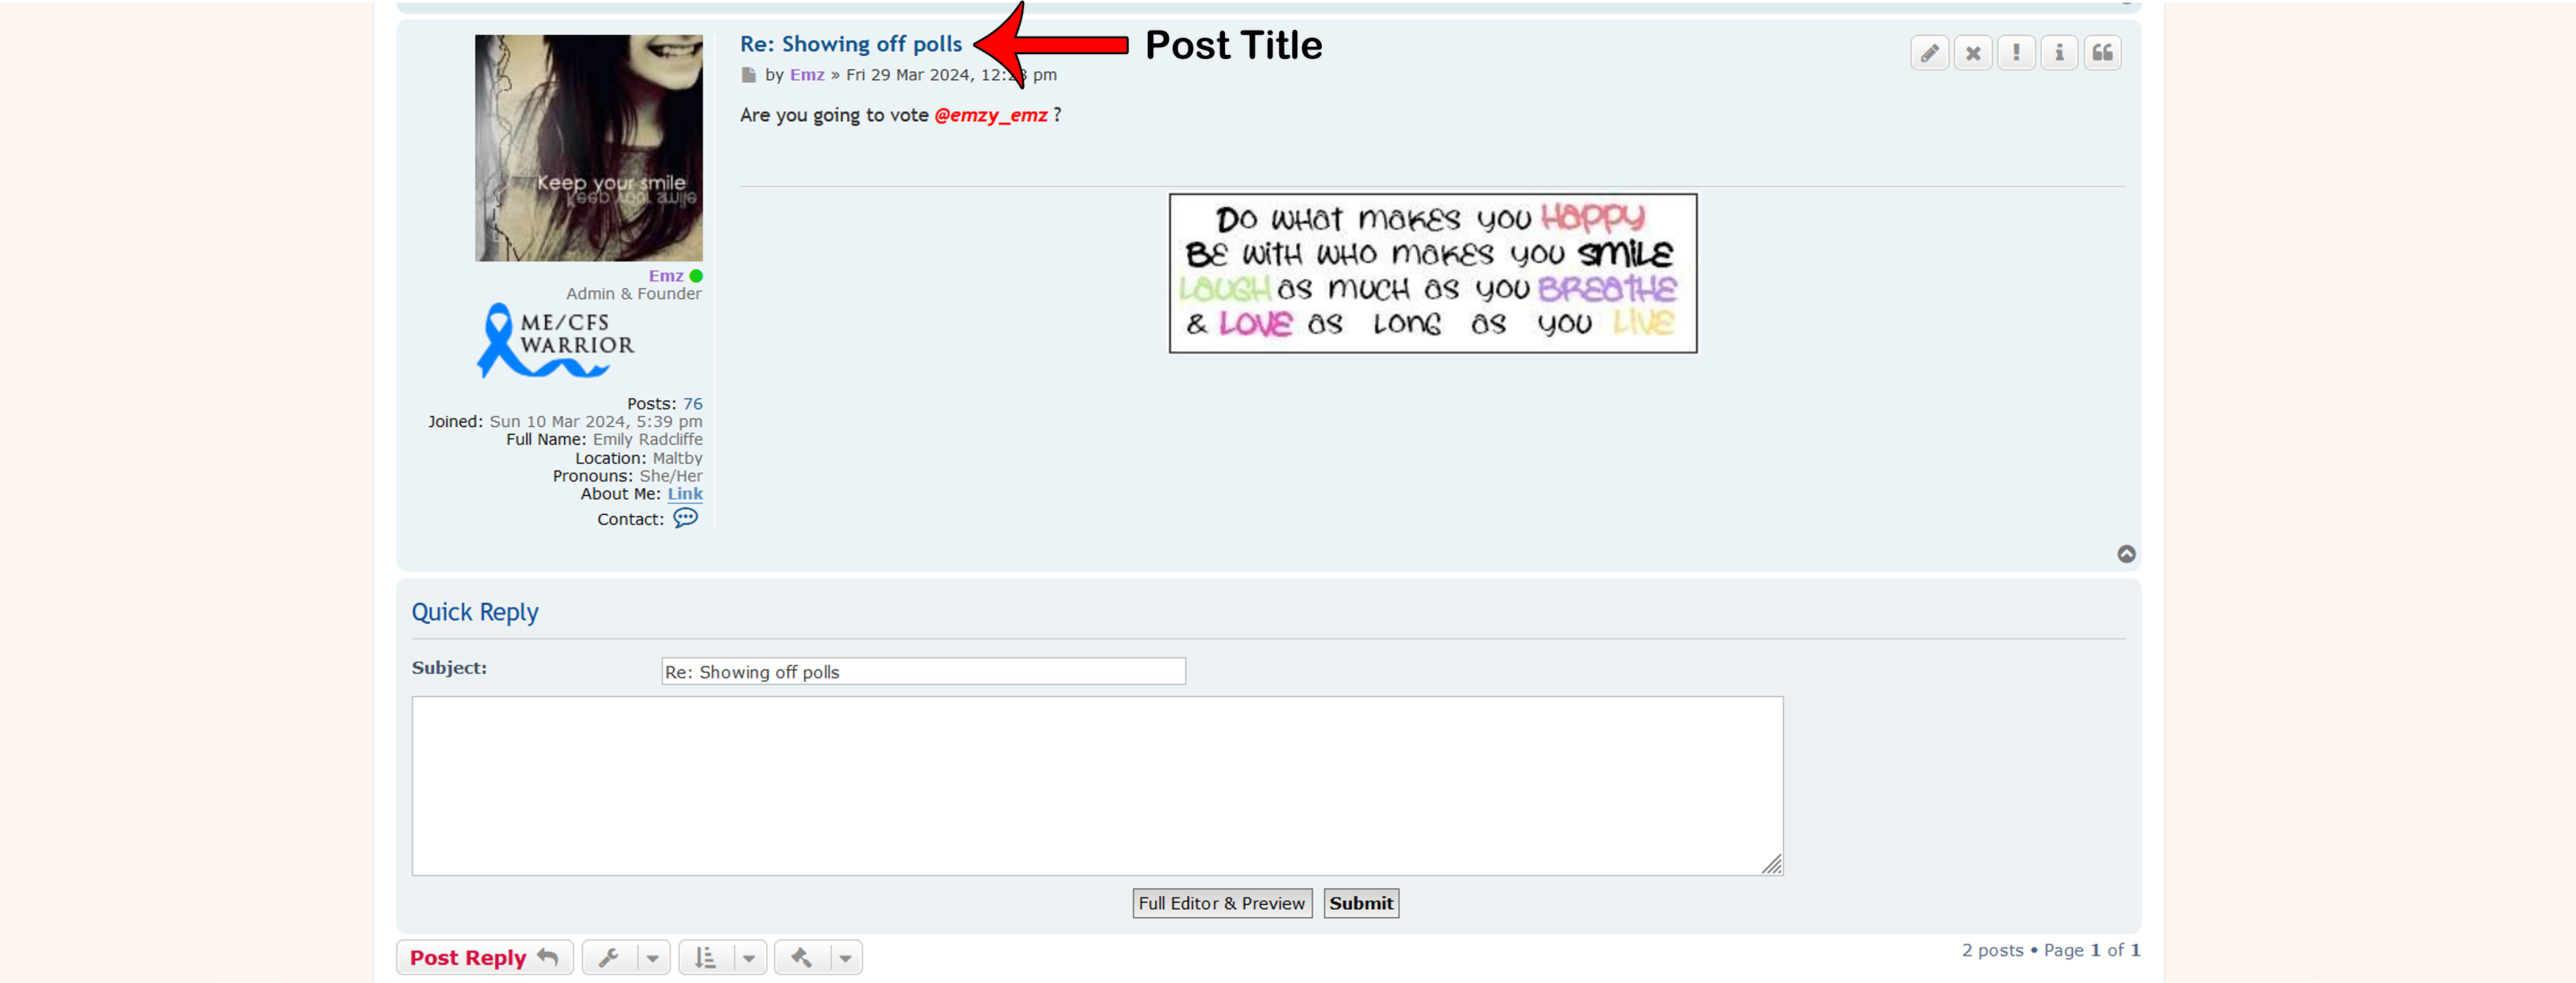
(Need a closer look? Clicking the image will open it up, right-click and select 'Open Link in New Tab' to not leave this page.)
For some reason or another, you wish to get the link to a particular post from a topic/thread and not just the link to the page that the post is on. This is easy enough, find the post you wish to link to, right-click on the title (which is usually 'Re:' and whatever the topic title is) and select 'Copy link' or click the title to take you to the post URL and copy the address from the URL bar.
Last bumped by Emz on Sat 02 Nov 2024, 1:07 pm.